

Configuring Karpenter: Lessons Learned From Our Experience


Several clients reported stability issues with their containerized databases and applications running single replicas, leading to unexpected downtime during scaling operations. These real-world problems prompted us to explore and implement Karpenter as a more sophisticated scaling solution.
In a previous article, I described what Karpenter is. I shared our experience migrating from the AWS Cluster Auto Scaler to Karpenter, providing a step-by-step guide to the installation process.
In this article, I'll describe how we configured Karpenter for the Kubernetes clusters we manage, detailing the setup, the challenges we encountered, and the strategies we used to fine-tune the configuration for optimal performance and reliability. Our configuration decisions were driven by real feedback from our users, ensuring that both single-replica workloads and complex applications could run reliably while maintaining cost efficiency.
Understanding NodePool and EC2 NodeClass
When deploying Karpenter, a key step is to create at least one NodePool that references an EC2 NodeClass. These configurations allow for fine-tuned control over how resources are allocated in your Kubernetes cluster.
To understand the flexibility Karpenter offers, let’s briefly compare it to AWS Cluster Autoscaler’s NodeGroup. In a NodeGroup, all EC2 instances must have identical CPU, memory, and hardware configurations. This rigid structure requires you to predefine instance types, limiting scalability and flexibility.
Karpenter’s NodePools, however, provide a more dynamic approach. Rather than being restricted to similar instance type, NodePools allow you to choose from a variety of instance types, architectures, and sizes, enabling Karpenter to optimize resource allocation based on real-time workload demands. This flexibility leads to better performance and cost efficiency compared to the nature of NodeGroups.
NodePool
A NodePool in Karpenter is a logical grouping of nodes that share specific configurations to meet the resource and scheduling requirements of your workloads. By using NodePools, Karpenter can efficiently manage and scale nodes within a Kubernetes cluster, optimizing both performance and cost.
What can be configured in a NodePool?
In a NodePool, several key aspects can be configured to define how nodes are provisioned and managed:
Requirements: You can specify the EC2 instance types to be used in the NodePool. This allows you to fine-tune the types of nodes provisioned based on the workload’s needs. Karpenter supports a variety of configuration labels, from specific instance types to broader requirements like instance categories or architectures.
For example, you can specify a list of particular instance types:
Alternatively, you can configure broader, more flexible criteria using instance categories, generations, or architecture:
Disruption Policies: NodePools can define policies that control when and how nodes are decommissioned. Karpenter offers two disruption policies:
- WhenEmpty: Nodes are only removed when they are completely empty, meaning no running pods remain. This is ideal for critical workloads where interruptions must be avoided.
- WhenEmptyOrUnderutilized: Nodes can be decommissioned when they are either empty or underutilized. This more aggressive policy helps reduce costs but may result in service disruptions for certain workloads.
Limits: You can set limits on CPU or memory for a NodePool. Once these limits are reached, Karpenter will stop provisioning new instances, ensuring that resource consumption stays within defined boundaries.
Taints: Kubernetes taints can be applied to nodes created inner a NodePool to control which pods can be scheduled on them. Taints prevent pods from being scheduled on a node unless they have a matching toleration, allowing you to isolate workloads or enforce specific scheduling rules.
Multiple NodePools
One of Karpenter’s powerful features is the ability to configure multiple NodePools in a single cluster. This allows you to create different groups of nodes tailored for various workloads.
When unschedulable pods appear, Karpenter evaluates all available NodePools to determine which one(s) can best accommodate the pod. The scheduling process involves several key steps:
- Priority based on weight: Karpenter considers the weight parameter of each NodePool to establish priority. NodePools with higher weights are given precedence over those with lower weights. By adjusting the weight, you can influence which NodePool Karpenter prefers when scheduling
- Taints and Tolerations: After determining the priority, Karpenter checks whether the NodePool has any taints. If so, it verifies whether the pod has the corresponding tolerations to bypass those taints. This mechanism allows specific workloads to be isolated to certain NodePools while preventing others from being scheduled on them.
- Pod requirements: Karpenter then verifies if the NodePool’s instance requirements align with the pod’s specifications. It evaluates factors such as:
a. Pod Topology spread constraints (pod.spec.topologySpreadConstraints). This helps ensure the availability of an application by spreading pods across different domains (e.g., across nodes or zones). For example, you can use kubernetes.io/hostname or topology.kubernetes.io/zone to define the spread.
b. Node affinity rules (pod.spec.affinity.nodeAffinity). These rules allow you to specify that a pod should run on nodes with certain attributes. For example, you can require a pod to run on a specific instance type (node.kubernetes.io/instance-type) or on an on-demand node (karpenter.sh/capacity-type). See the list of well-known labels for more options.
c. Pod affinity rules (pod.spec.affinity.podAffinity). These rules ensure that pods are scheduled on nodes that already have other specific pods running, enhancing efficiency and communication
d. Node selectors (pod.spec.nodeSelector). Choose to run on a node that is has a particular label.
EC2 NodeClass
An EC2 NodeClass defines specific attributes for the EC2 instances that will be created. Configurations include:
• Block device mapping (disk setup),
• AMI family (the type of AMI image to use),
• Roles, tags, and subnets.
Our configuration
The first attempt
Initially, we configured a default NodePool without any taints and set requirements that allowed a variety of nodes from the two different architectures (ARM and AMD). We applied a consolidation policy of WhenEmptyOrUnderutilized.
This configuration, while cost-efficient, introduces potential risks for applications running only a single pod. Karpenter’s dynamic scaling decisions are based on node utilization. When it detects that a node is underutilized , it may choose to decommission that node in order to optimize resources. For applications with only one replica (either because the number of replicas was set to 1, or because the Horizontal Pod Autoscaler scaled down), this will result in downtime. This issue isn't unique to Karpenter, but it becomes more apparent when using Karpenter compared to the AWS Cluster Autoscaler. Karpenter is more aggressive and dynamic scaling approach makes the challenge of managing single-instance applications more visible.
We considered a few ways to handle this issue:
• Adding a PodDisruptionBudget (PDB) with minAvailable set to 1 to prevent the pod from being disrupted.
• Using the karpenter.sh/do-not-disrupt annotation to prevent Karpenter from touching these specific nodes.
The downside of the previous solutions is that nodes with pods that cannot be moved due to a PDB or the ‘do-not-disturb’ annotation become locked for Karpenter. As a result, Karpenter cannot consolidate these nodes to perform its cost optimizations.
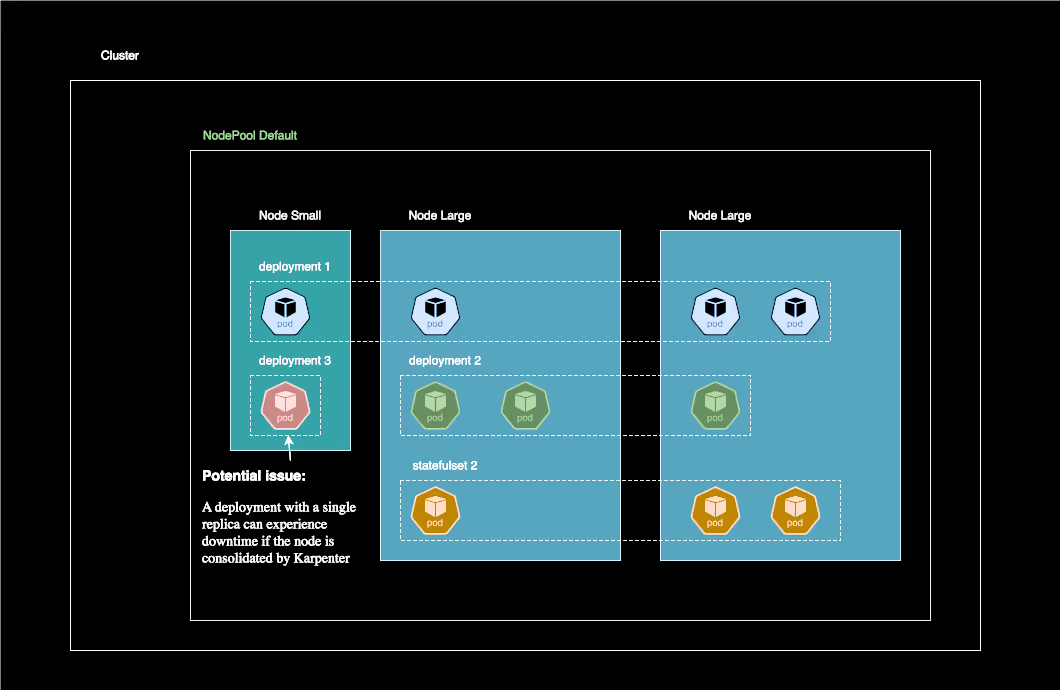
This diagram illustrates the limitations of using a single NodePool with WhenEmptyOrUnderutilized policy. On the left, single-replica pods risk downtime during consolidation.
Introducing another NodePool
To resolve this, we decided to introduce a second NodePool alongside the default pool. This new NodePool was configured with a taint that excluded any pods without the corresponding toleration, forcing those pods to run on the default pool.
This additional pool, named stable, was configured with a disruption policy set to WhenEmpty. This means Karpenter will only remove nodes from this pool if they are completely empty (i.e., no running pods).
We chose the services that might experience instability (such as those with only one replica) to target this new stable NodePool. This allows Karpenter to optimize the default NodePool freely without causing downtime. At the same time, applications that are more sensitive to interruptions are isolated in the stable NodePool, where Karpenter can only remove a node if it is no longer hosting any pods.

This diagram shows our improved architecture using two NodePools: a default pool optimized for cost with WhenEmptyOrUnderutilized policy (left), and a stable pool with WhenEmpty policy (right) for single-replica and stability-sensitive workloads. This setup enables cost optimization while protecting critical services from disruption.
Future optimizations
One possible solution we are considering, enabled by the recent updates to Karpenter (starting with version 1.0), is to allow the stable NodePool to switch its disruption policy during specific time windows. This could temporarily disrupt nodes that are underutilized during low-activity periods.
Here is a configuration example that allows the nodes to be disrupted only if they are empty or drifted between 6 pm and 2 am. A node can be disrupted between 2 am and 6 pm if it is underutilized.
While this setup introduces potential downtime, it would be more appropriate for a non-production cluster. In a production environment, best practices dictate avoiding single-replica services as a minimum, since this can lead to instability and downtime, which are unacceptable in production scenarios.
Addressing Node Count Challenges with Karpenter
One challenge we encountered with Karpenter is that it optimizes for the cost of instances rather than the number of instances. This can be problematic if you are using services or tools that charge based on the number of nodes in your cluster. In such cases, Karpenter might provision several smaller, cheaper instances instead of fewer larger ones, which can inadvertently increase the overall number of nodes—and consequently, the associated costs—even if the total instance cost is lower.
This issue becomes more pronounced when relying on spot instances, which are cheaper but not currently consolidated by Karpenter. Unless you enable the SpotToSpotConsolidation feature, Karpenter won’t automatically consolidate spot instances, leading to more instances being provisioned and retained. (this feature is still in alpha at the time of writing: karpenter version 1.0)
Additionally, if you’re using a NodePool with a WhenEmpty disruption policy, Karpenter can only remove nodes once they are completely empty. This can prevent efficient consolidation and contribute to an inflated node count, as nodes may remain in use for extended periods even if they’re underutilized.
Proposed Solution
A potential solution is to restrict the range of instance sizes that Karpenter is allowed to provision within a NodePool. By avoiding smaller instance types, for example, you can reduce the likelihood of having many nodes. Even though some nodes might be underutilized.
In practice, configuring your NodePool to provision only medium to large instances ensures that Karpenter consolidates workloads onto fewer, more powerful nodes, ultimately minimizing the node count while maintaining cost efficiency.
Conclusion
Throughout our experience with Karpenter, we've found that while this tool brings significant value to dynamic Kubernetes resource management, it requires thoughtful configuration to optimize its usage effectively.
Karpenter's flexibility allows for fine-tuned configuration based on specific needs. However, it's essential to understand the implications of each parameter and maintain a balance between cost optimization and system stability.

Suggested articles
.webp)


.svg)
.svg)
.svg)
