Build Your Own Network with Linux and Wireguard
Last Christmas, I bought my wife “Explain the cloud like I am 10” after she told me many times that it was hard for her to relate to what I am doing in my daily work at Qovery. While so far, I have been the sole reader to enjoy the book, I was wondering during my lecture if there were any resources to explain how to build all that.
I reached https://github.com/codecrafters-io/build-your-own-x expecting to find some treasure to undig, but I ended up disappointed to find nothing related to infrastructure/cloud. Most topics are software oriented.
So, in this article, I am going to explain how to build your own cloud network 🎊

Romain Gérard
October 5, 2023 · 24 min read
Hold the door a minute before rushing out; the cloud term is wide https://www.cloudflare.com/learning/cloud/what-is-the-cloud/ and relates to many concepts like scalability, reliability, availability, elasticity, on-demand, etc…
Those are too many concepts at once, so I am going to narrow down the definition for the sake of teaching some knowledge. I am going to focus on the network part, on how to build your own place on the Internet, how to carve your little network cave reachable from others over the Internet!
#Part I: Network plane
Ok, where do we start now? Whenever you want to host your next startup toy idea or this very cool Rust project called Warpgate to have smart SSH and HTTPS bastion, you need an address. On the Internet, those are called IP addresses, and they come in two flavors: IPv4 and IPv6 https://www.cloudflare.com/learning/dns/glossary/what-is-my-ip-address/.
Getting an IPv4 for yourself nowadays is almost impossible without putting a lot of 💸 on the table. You can see the current IPv4 exchange price on this site https://auctions.ipv4.global/ and as of today writing, there is nothing for less than 9000$ for a /24 subnet, which consist of only 255 IP address.
You may wonder why buying 255 addresses when you only need at first 1 ? Well, because, by convention, people routing traffic on the internet have decided that a /24 is the smallest routable subnet. It is like your post office telling you that unless you live in a suburb with at least 255 houses, you will not get any postman coming to your mailbox to deliver your letters.
If you are starting today, invest time learning IPv6; even if IPv4 may never really die, IPv4 is getting end of life due to the small amount of remaining available IP addresses. Even AWS recently announced that they are not going to support the ever-growing cost of buying new IPv4 address https://www.theregister.com/2023/07/31/aws_says_ipv4_addresses_cost/, and they will start transferring this cost to clients next year (2024), hoping to incentive people to migrate to IPv6.
Thanks to mobile carrier https://apenwarr.ca/log/20170810, IPv6 is pretty well-supported, and almost all major players on the Internet are reachable on IPv6. All? Sadly no. Some still resist, like GitHub…
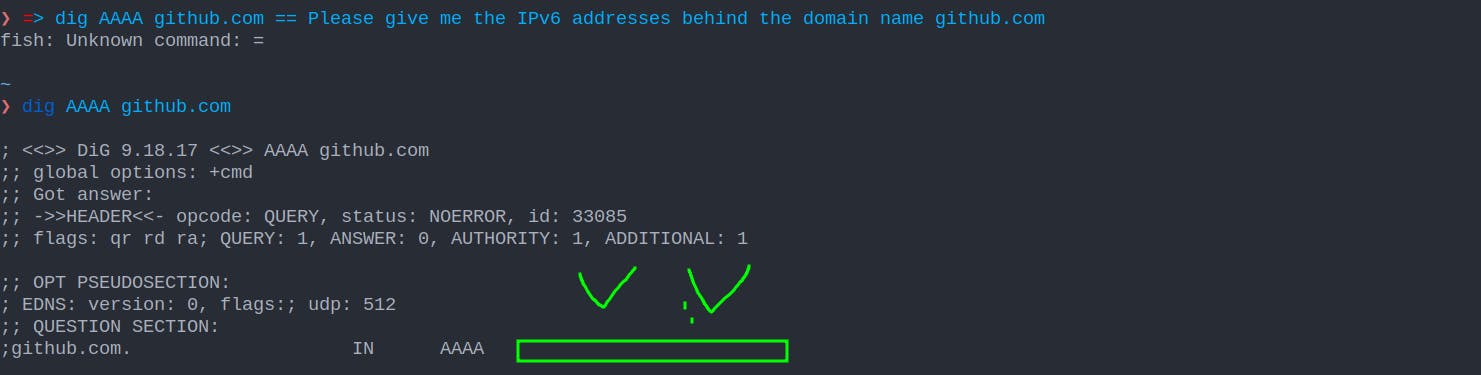
Yes, it is 2023, and GitHub is not IPv6 ready yet; https://github.com/orgs/community/discussions/10539. Shame on them!
So, how do we get our IPv6 addresses? Well, it depends on where you are located on earth. IPs are managed by Regional Internet Registries (RIR), and they oversee the allocation and registration of Internet number resources (IPv4 addresses, IPv6 addresses, and autonomous system numbers) in a specific region. If, like me, you are in Europe, the IP address you use to surf on the web is handled to your ISP by the RIPE NCC https://www.ripe.net/
Bad news: you can’t contact your RIR directly as an individual amateur; you are too insignificant, but luckily for you, RIR delegates some of its power to Local Internet Registries entities called LIR for short https://www.ripe.net/participate/member-support/list-of-members/europe.

If you contact a LIR https://www.servperso.net/ripe-ncc-lir-services you can request their services to acquire an IPv6 address space, and they will ask you, “Which kind do you want ?”. There are 2 types of allocation possible
- Provider Independent (PI) allocation, which is expensive, because the LIR is only sponsoring your demand directly to the RIR. By requesting a range of those types, you must become a member of your RIR, pay the fees associated with it, and provide some guarantees regarding transit partners… This kind of allocation is only necessary if you want to start your own business and want to be serious about it. For an amateur, while you can do it, it is expensive and requires paper works … https://www.ripe.net/manage-ips-and-asns/ipv6/request-ipv6/how-to-request-an-ipv6-pi-assignment
- Provider Aggregated (PA), which are IP ranges that are carved out of the LIR own range, can be leased to individuals \o/ The range you request will be owned by the LIR, so you cannot transfer it, but after the assignation of it to you, you will be the administrator of the IPv6 range 😎 The fees to own a PA range will be ~100$ per year, but after that, you will get the power to play with Internet. You will be a real citizen of it!
Okay, but now that I have my IPv6 range, how do I get others from the internet to talk to me? Well, that’s simple
- You learn BGP https://www.youtube.com/watch?v=1pi18uNqsO4&list=PLjVwd8FlHBAQk5U2ScrjpeRJujGTCaMfR&index=1
- You find a provider that allows you to peer with them to exchange BGP route https://docs.google.com/spreadsheets/d/1abmV_mXWWCsVxHLfouSivyS7ch-PcUww8S6ksY66c5o/edit?pli=1#gid=0 ****
- And once done, you announce your routes like the brave citizen you are!
- Easy, and you can even play with it freely at https://dn42.eu/Home
Well, wait, is that not a bit overblown? You are telling me that in order to host my simple blog, I need to pay hundreds of dollars per year just to get an IPv6 range, leaving people using IPv4 behind, and learning low-level BGP networking first?
Hum, yes, maybe, but you wanted to learn, so ¯\(ツ)/¯
#Part 2: Practical Network plane
Okay, okay, let’s say that having your own IP address space is a bit overkill; where else can you get some public address? When you are in need of a lighter, and you don’t have one, you need to ask others for one.
In the end, you don’t have many options:
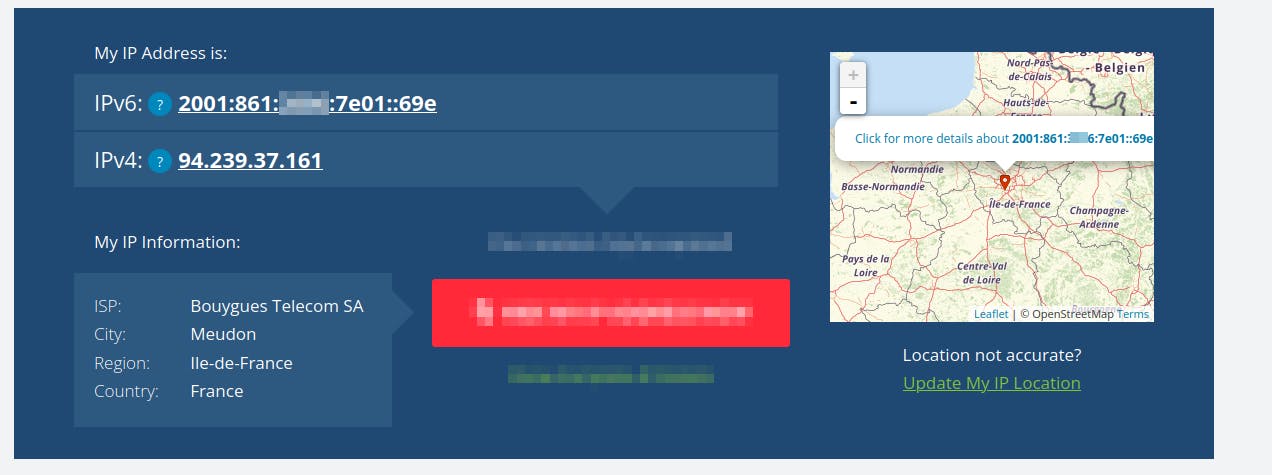
Your ISP, if you are reading this article, you are already on the internet, meaning somehow you already have an IP address, that you can easily find out by visiting this site https://whatismyipaddress.com/
While it is possible to start your own cloud using your ISP IP address, I don’t recommend it because there will be many more moving parts than necessary, making things difficult at first.
- You may have a dynamic IP allocated to you, meaning after some time, your ISP will rotate your address and give you a new IP. In this case, you have to set dynamic DNS https://en.wikipedia.org/wiki/Dynamic_DNS and use an external service like https://www.noip.com/remote-access for your own cloud to be easily usable
- ISP networks are heavily protected/filtered/firewalled. For example, you often can’t run or contact a mail server on your ISP network, because to avoid spam or people with infected machines, they just wholly drop this kind of traffic. From ISP to ISP, it is tough to know what their rules are regarding traffic policy, so you will be left to wonder why it does not work without a lot of information to troubleshoot the issue
- Between you and your ISP, there is a box they provide you, the router, to control the traffic between your home network and their network. Again, it widely differs between ISPs, but you can’t do everything you may need because to reduce their support/protect abuse, they forbid some usage.
- Your partner may not like that you break the Internet (aka the Wi-Fi) and do not care that you want to learn; she wants something working. So, your couple will thank you if you start your cloud experiments somewhere else.
So, what solutions are left? Turn out, we need to build upon the shoulder of giants and benefit from the presence on the internet of somebody already established and who has a public endpoint to route traffic to you.
#Cloudflare: The Leazy solution
The path of least resistance, and with maximum benefit nowadays, is to use Cloudflare tunnel. I won’t go into too many details for this solution, as there are already a lot of tutorials regarding how to set it https://www.crosstalksolutions.com/cloudflare-tunnel-easy-setup/ and this solution has some severe limitations (see below).
But in essence, you are going to run a binary on your own network/server, which is going to establish a tunnel to Cloudflare infrastructure. In turn, Cloudflare is going to route public/internet traffic to you through this tunnel, which will make people be able to access services from your internal/non-public network.
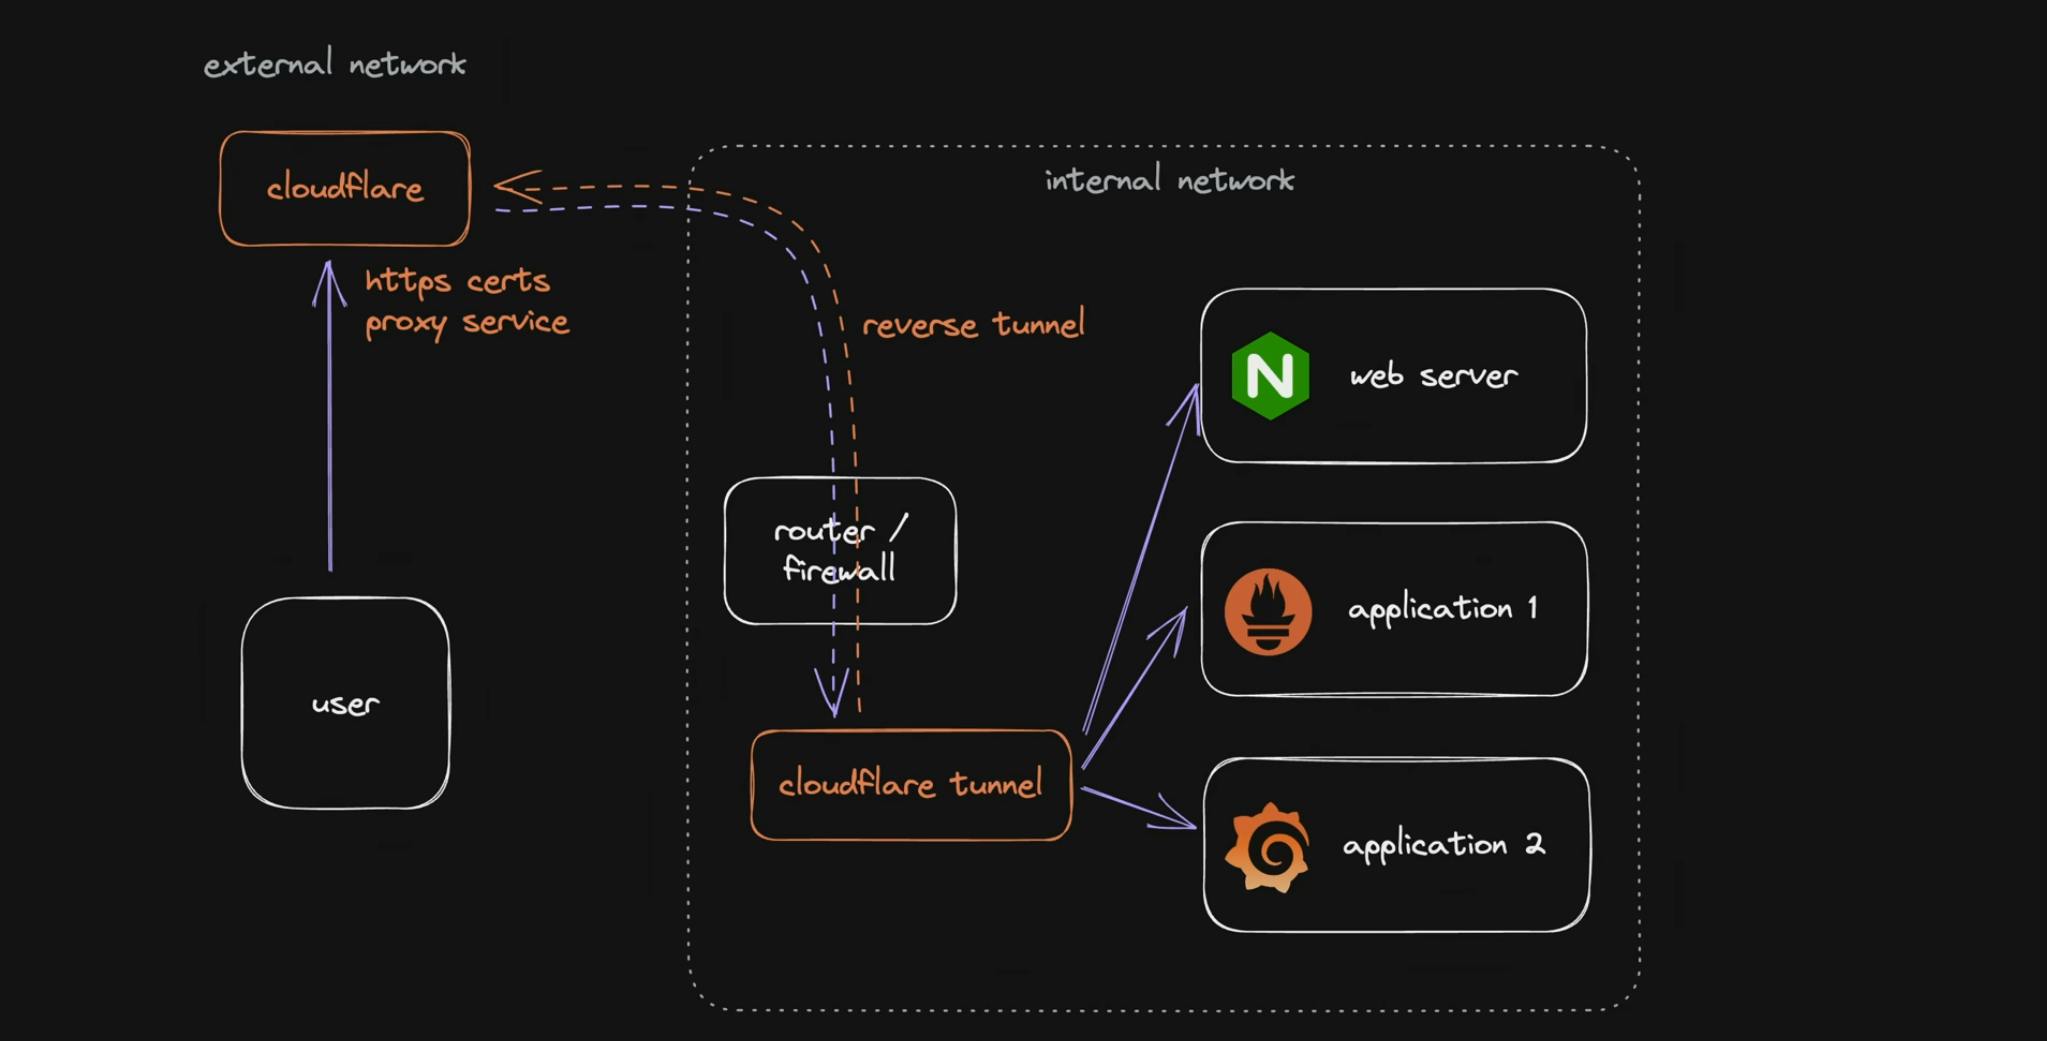
While this solution works and is easy to setup, there are limitations to it:
- You will be limited to HTTPs ports (80 & 443)
- Cloudflare Terms of Service forbid you to use a disproportionate amount of traffic for images/videos/…; basically anything non-web (HTML, CSS, JS) related
- It is easy to set, but harder to extend later when you will need it. You will have to rely on Cloudflare tooling/features for that.
- There are other downsides that you can find at https://www.youtube.com/watch?v=oqy3krzmSMA
#Your own Virtual Private Network
Now let’s get to the real deal: we are going to do the same setup as Cloudflare tunnel, but this time without the caveat, besides consuming your time. You will be free to route through your tunnel whatever kind of traffic you want, and you will have a network that you will be able to extend as your usages grow.
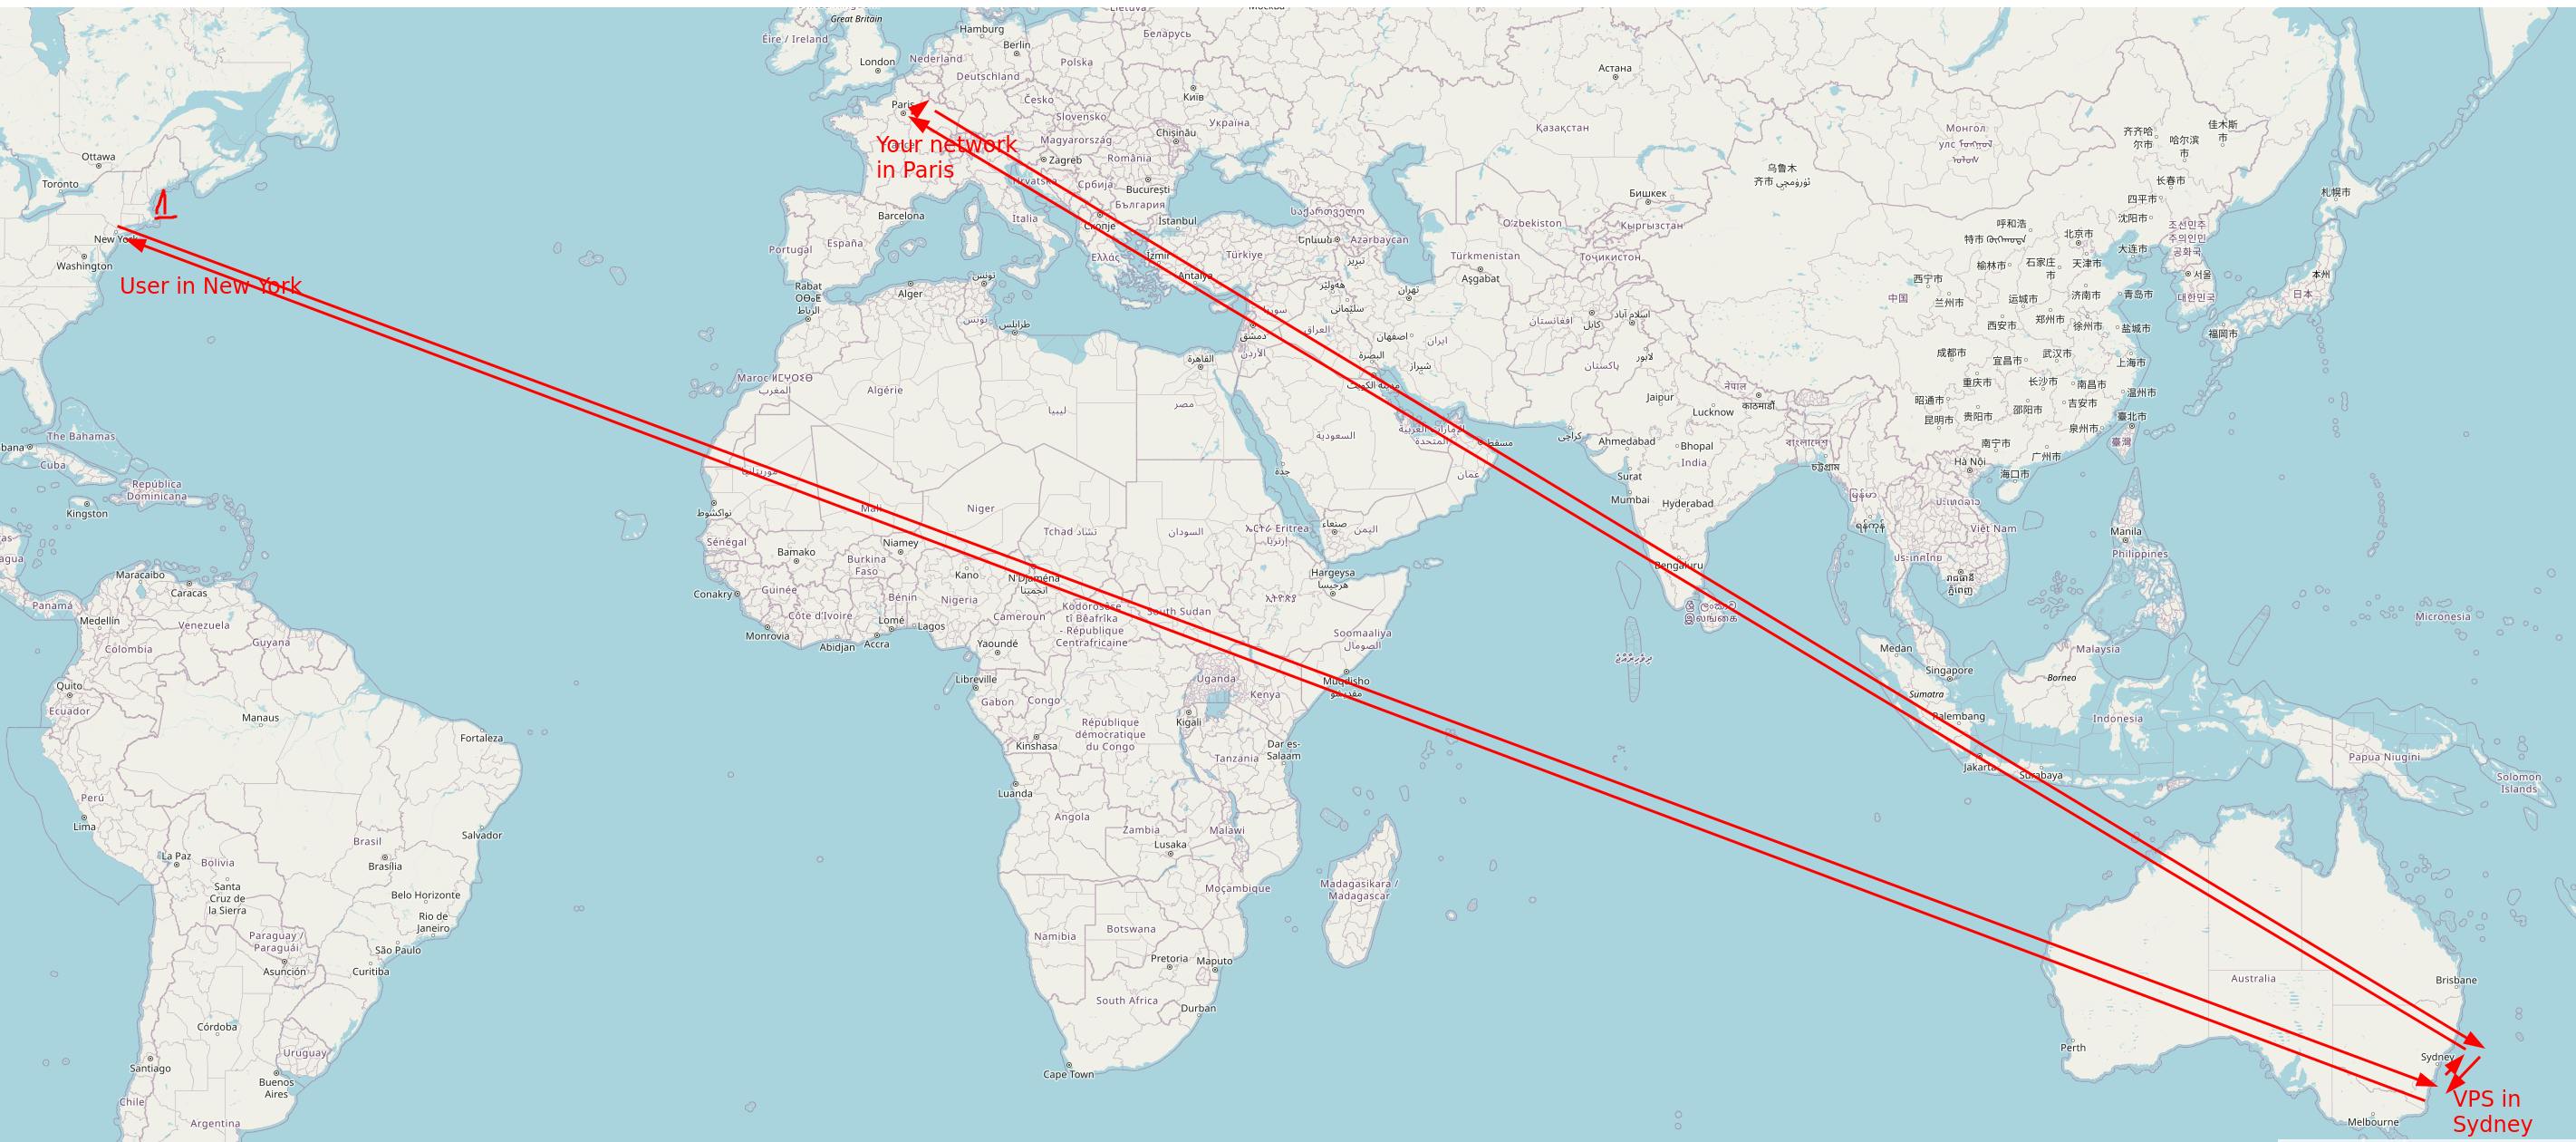
We still need a public IP address, and it turns out, as we have seen before, we need somebody to lend us one. There are not many options besides, going to ask a hosting provider and rent a cheap VPS.
You can choose whatever hosting/VPS company you want, as we will just shuffle network packets around, it does not matter too much.
Just take a VPS close to your own home/cloud network location, as traffic needs to flow through the VPS it will be inefficient to pick one in Sydney if your private network is in Paris, for example. You want to minimize the travel distance for a packet between your VPS and your network.
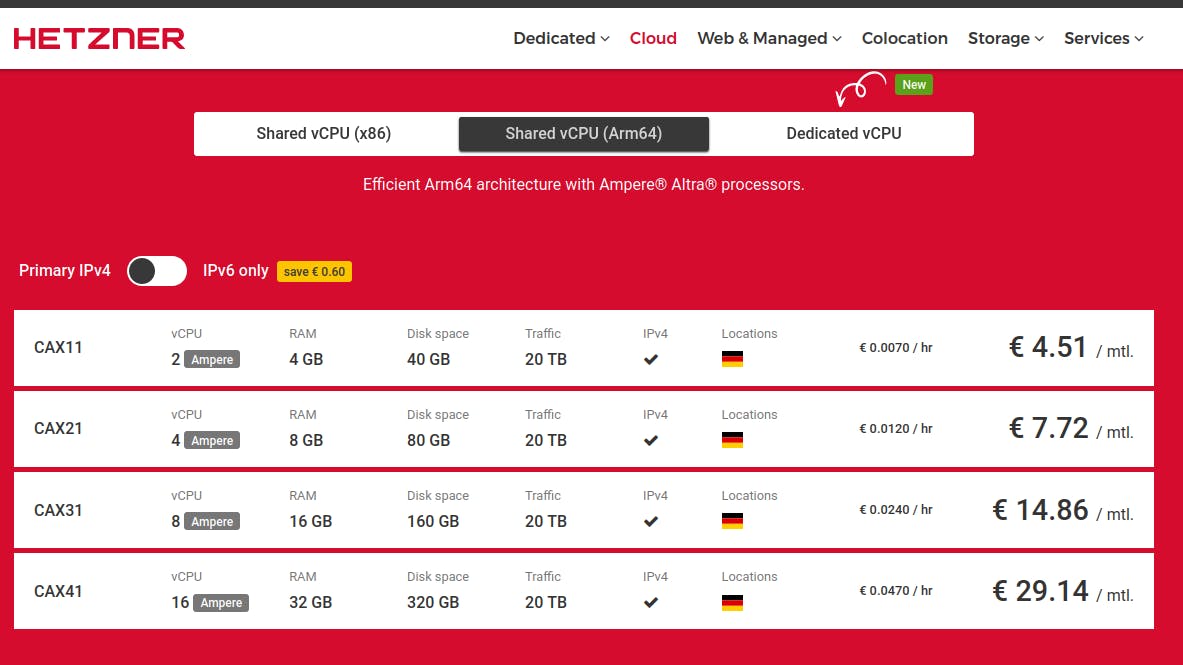
If you are looking for any recommendations, I would advise Hetzner, they provide affordable and reliable instances in Europe. You can get 2vCPU and 4GB with 20Tb of traffic for 5$ per month. Except if you want to run some applications on the VPS, which will not be the case for this guide, you don’t need to bother with the CPU architecture. All that is required is to be able to install Linux to move packets around. (I heard that Linode is a good choice if you are in the US)
Once you have your provider, pick the VPS you want and install Linux on it, preferably Debian Bookworm, as the remaining of the guide will be based upon it.
Your VPS in hand ssh/shell inside it and run the command ip a to list all the interfaces of your machines and get their associated IP address, and, at last …
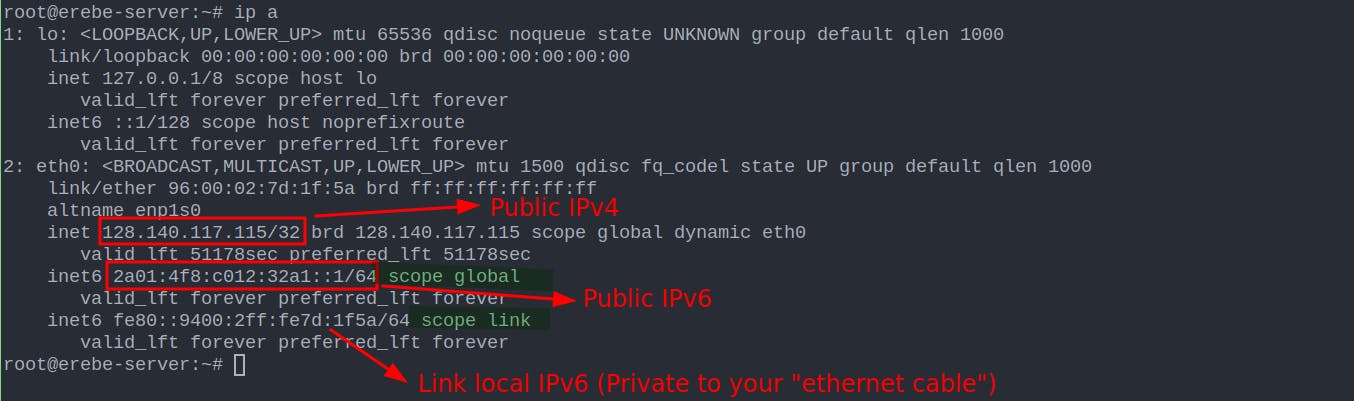
You now have your own public IP address, your gateway to the Internet, and the entry point of your own cloud; congrats 🎆🎊.
From your local machine, if you have access to the internet, you should be able to ping those IPs and see that they respond.

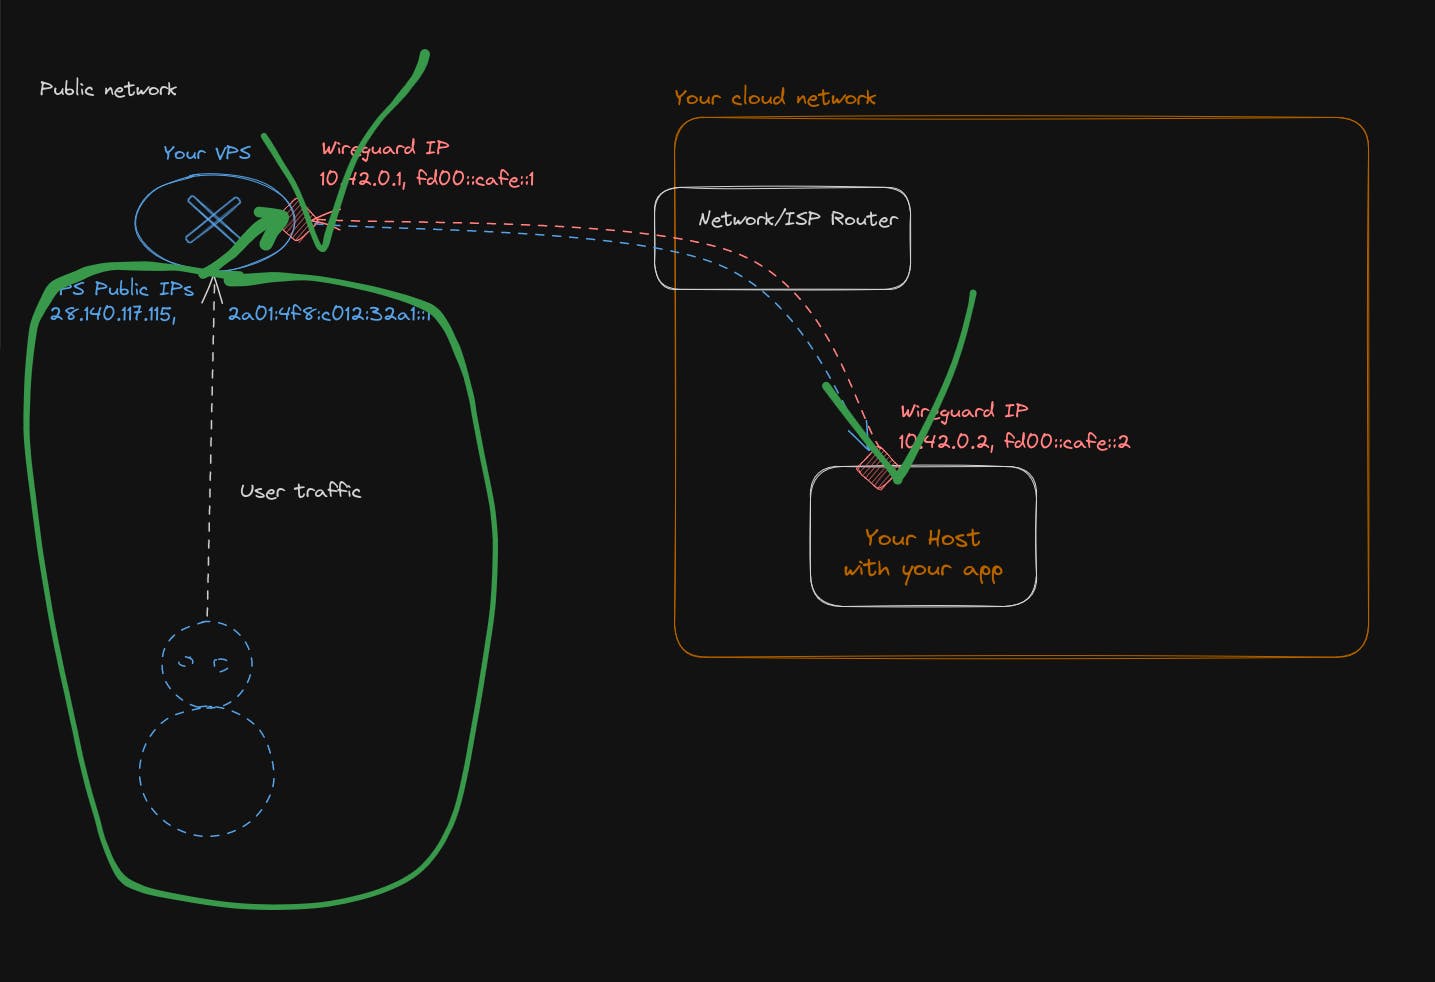
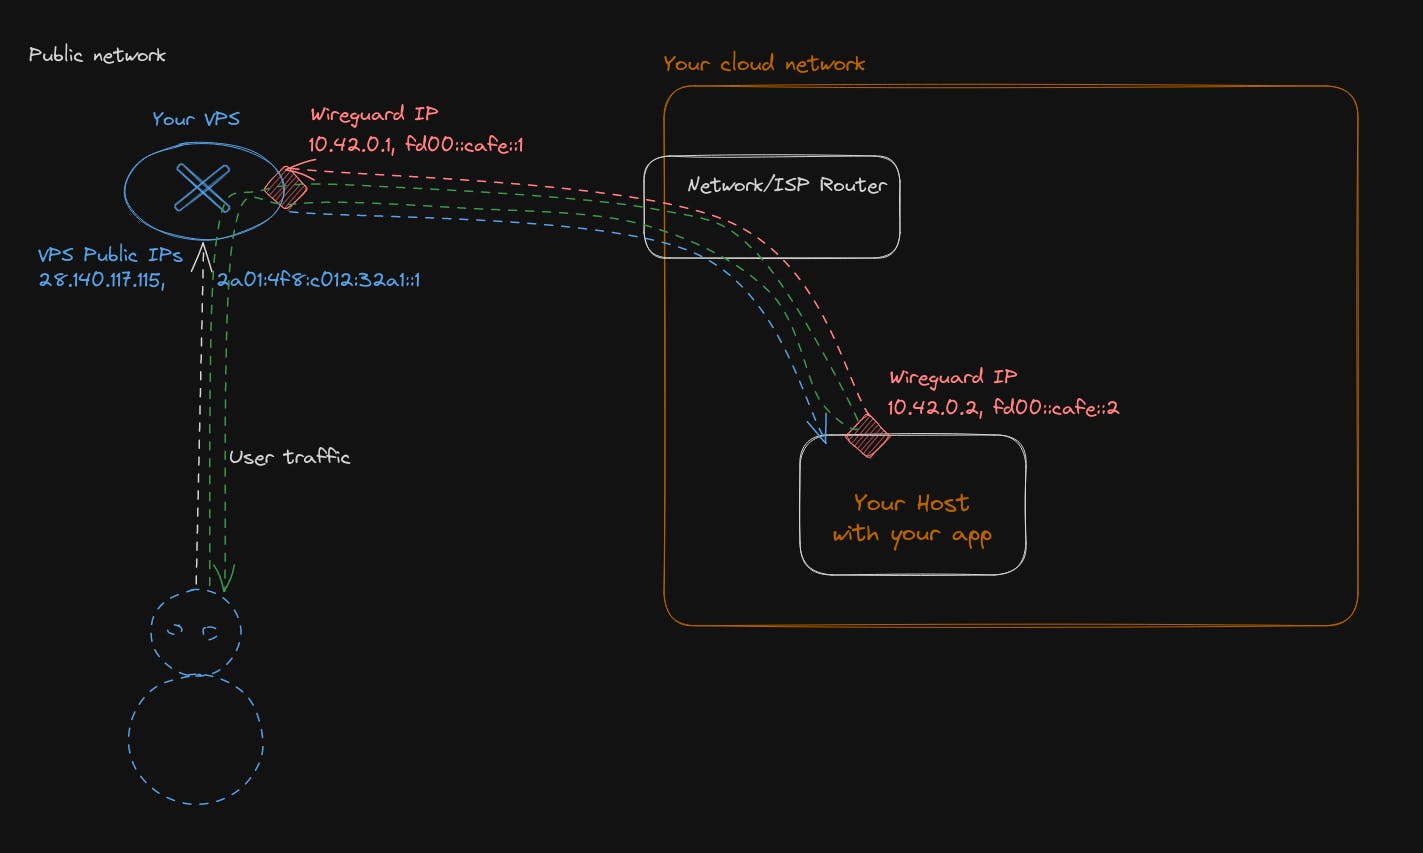
#Building the Private Network with Wireguard
We are going to build the following network plane, with the help of Wireguard, which I let describe itself by saying it is a straightforward yet fast and modern VPN that utilizes state-of-the-art cryptography. It aims to be faster, simpler, and leaner than other alternatives.
After the build, you will be able to reach your application running inside your own cloud network from the Internet.
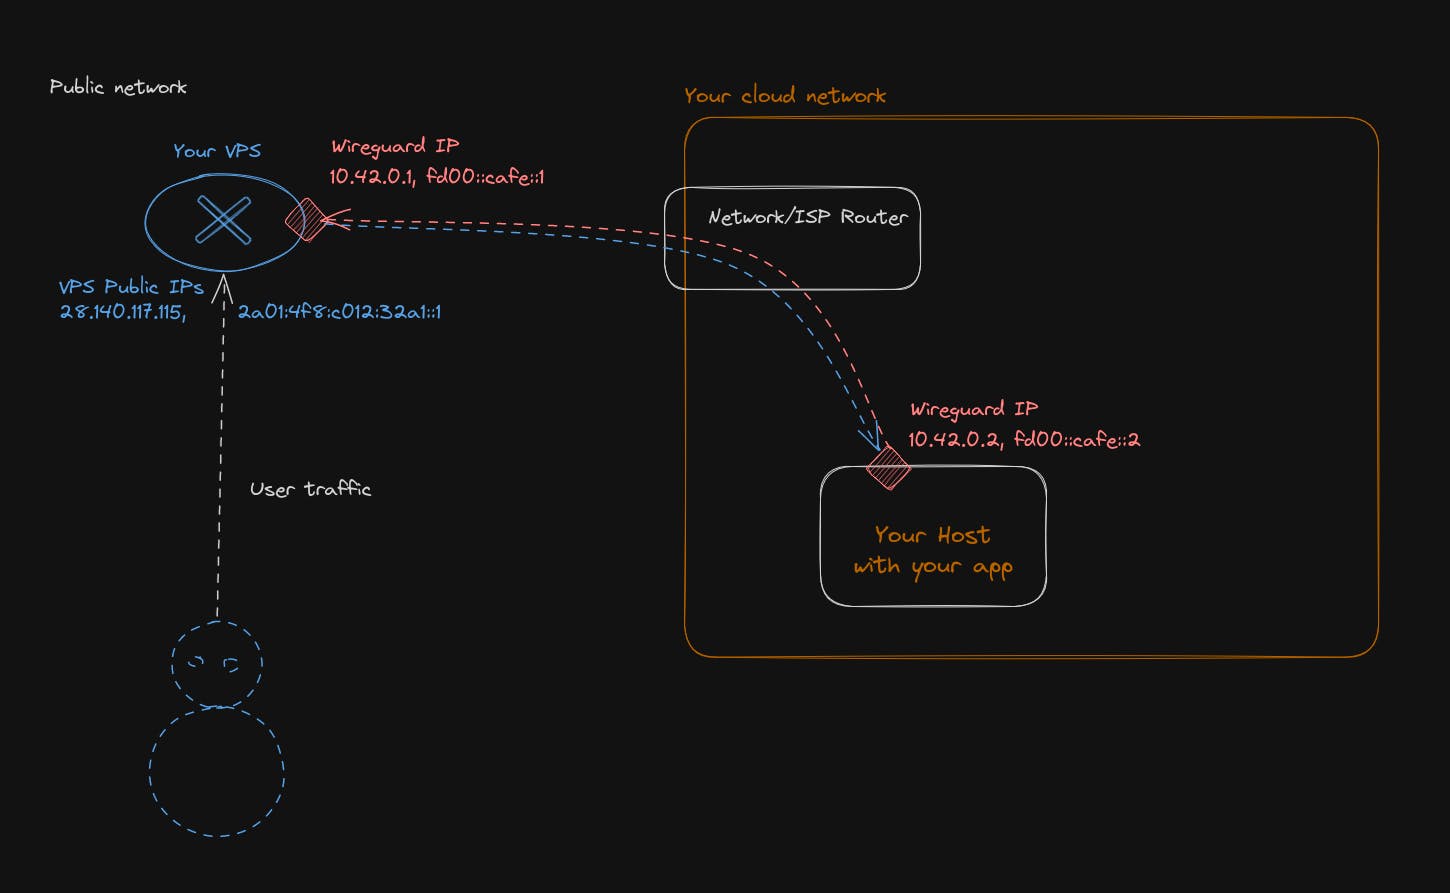
Our network will have 2 subnets, 1 for IPv4 and another subnet for IPv6.
- IPv4 will be 10.42.0.0/16, meaning you can assign 65,536 IPs inside it
- IPv6 subnet will be fd00::cafe::0/32, meaning you can assign 2^96 ip inside it.
Those 2 network subnets are private network ranges. So, those IPs will never be visible to the public Internet. They will never be routed outside your cloud network. Users will always see as a destination or source the IP address of your VPS, and everything inside your cloud network will be hidden.
A short mention for IPv6: Why pick a private network range when you can assign a globally routable range, as there is enough public IPv6 to do it and avoid NAT traffic? Because this is a beginner guide, and for security, it will avoid you from making routing mistakes and exposing too much of your network publicly without being aware of it. Laying at first a private IP range does not mean it is a dead end for later. You can then assign a 3rd subnet, which will be an IPv6 public range on your wireguard network in addition to the private one. There will be no conflict in doing so.
Let’s be honest now, and install everything. Drop into a root shell of your VPS and type
# Those command is going to update packages index of debian package manager
# and upgrade all of the already installed package if needed
root@erebe-server:~# apt-get update && apt-get upgrade -y
Hit:1 http://mirror.hetzner.com/debian/packages bookworm InRelease
Hit:2 http://deb.debian.org/debian bookworm InRelease
Get:3 http://deb.debian.org/debian bookworm-updates InRelease [52.1 kB]
Hit:4 http://security.debian.org/debian-security bookworm-security InRelease
Hit:5 http://mirror.hetzner.com/debian/packages bookworm-updates InRelease
Hit:6 http://mirror.hetzner.com/debian/security bookworm-security InRelease
Fetched 52.1 kB in 1s (51.1 kB/s)
Reading package lists... Done
Reading package lists... Done
Building dependency tree... Done
Reading state information... Done
Calculating upgrade... Done
0 upgraded, 0 newly installed, 0 to remove and 0 not upgraded.
Next, we are going to install Vim, nano, Wireguard, curl, and the network firewall filter for Linux
root@erebe-server:~# apt-get install -y vim nano curl wireguard nftables
Reading package lists... Done
Building dependency tree... Done
Reading state information... Done
nano is already the newest version (7.2-1).
The following additional packages will be installed:
  libgpm2 libsodium23 vim-runtime wireguard-tools
Suggested packages:
  gpm firewalld ctags vim-doc vim-scripts
The following NEW packages will be installed:
  curl libgpm2 libsodium23 nftables vim vim-runtime wireguard wireguard-tools
0 upgraded, 8 newly installed, 0 to remove and 0 not upgraded.
Now that wireguard, is installed, we need to configure it for our selected network topology.
# First we need to create a pair of public/private key in order for wireguard
# to authentificate the traffic with other member/peer of the VPN
root@erebe-server:~# cd /etc/wireguard/
root@erebe-server:/etc/wireguard# wg genkey | tee vps.private_key | wg pubkey > vps.public_key
root@erebe-server:/etc/wireguard# cat vps.private_key
iHpkNVE8N1UJQMRGC5m+5pFwQ2033+0aXoFjreOleXo=
root@erebe-server:/etc/wireguard# cat vps.public_key
o4+7UAAWisNyfYVGz14yjYPdoMPXgYSrhMeuqnHJwkw=

# We do the same for each machine of our VPN,
# in our case the machine that will host our application
root@erebe-server:/etc/wireguard# wg genkey | tee my_cloud.private_key | wg pubkey > my_cloud.public_key
root@erebe-server:/etc/wireguard# cat my_cloud.private_key
uHCucaCykm7piC8K5GyRTH6JiGk4oXomnZnTZRjfyUs=
root@erebe-server:/etc/wireguard# cat my_cloud.public_key
quQJVt24et5+EYUVE+K95CbSQ1kbvoDoFp5ZcCDvgCE=
You should now have a pair of keys for your VPS; keep the private key secret; only your VPS should have access to it. The public key can be communicated to other peers of your private network to exchange traffic with your VPS.
Now, let's configure wireguard on the VPS
root@erebe-server:/etc/wireguard# vim /etc/wireguard/wg0.conf
# Write this config file
[Interface]
# This is the ip address that our VPS will have in our private network
Address = 10.42.0.1/16, fd00:cafe::1/32
# Private key of the VPS we generated
PrivateKey = iHpkNVE8N1UJQMRGC5m+5pFwQ2033+0aXoFjreOleXo=
# Tell wireguard to listen on this port to accept traffic for the VPN
ListenPort = 995
# By default linux does not allow to transfer a packet coming from one interface
# to another one. Those settings activate packet forwarding as it is exactly what we need
# Packet coming from public interface need to be transfered to the VPN interface
PostUp = sysctl -w net.ipv4.ip_forward=1
PostUp = sysctl -w net.ipv6.conf.all.forwarding=1

[Peer]
# Public key of our machine that is hosting our app
PublicKey = quQJVt24et5+EYUVE+K95CbSQ1kbvoDoFp5ZcCDvgCE=
# Ip address for our host machine will be allowed to use
AllowedIPs = 10.42.0.2/32, fd00:cafe::2/128
Save and exit vim (by typing:x), and now everything is ready to start wireguard on our VPS. Execute the following command
# Start wireguard interfance that will receive traffic for the VPN
# If you modify the configuration in /etc/wireguard/wg0.conf you need to
# wg-quick down wg0 && wg-quick up wg0 the wireguard interface

root@erebe-server:~# wg-quick up wg0
[#] ip link add wg0 type wireguard
[#] wg setconf wg0 /dev/fd/63
[#] ip -4 address add 10.42.0.1/16 dev wg0
[#] ip -6 address add fd00:cafe::1/32 dev wg0
[#] ip link set mtu 1420 up dev wg0
[#] sysctl -w net.ipv4.ip_forward=1
net.ipv4.ip_forward = 1
[#] sysctl -w net.ipv6.conf.all.forwarding=1
net.ipv6.conf.all.forwarding = 1
And now, if we look at the network interfaces of the VPS, we should have a new interface 😎
root@erebe-server:~# ip a
# ...
# We can see it has 1 IPv4 address 10.42.0.1 and 1 IPv6 fd00:cafe::1
4: wg0: <POINTOPOINT,NOARP,UP,LOWER_UP> mtu 1420 qdisc noqueue state UNKNOWN group default qlen 1000
    link/none
    inet 10.42.0.1/16 scope global wg0
       valid_lft forever preferred_lft forever
    inet6 fd00:cafe::1/32 scope global
       valid_lft forever preferred_lft forever

# That we are able to ping (locally)
root@erebe-server:~# ping fd00:cafe::1
PING fd00:cafe::1(fd00:cafe::1) 56 data bytes
64 bytes from fd00:cafe::1: icmp_seq=1 ttl=64 time=0.048 ms
64 bytes from fd00:cafe::1: icmp_seq=2 ttl=64 time=0.038 ms
For the setup to be persistent after reboot, we need to register it as a startup program in systems.
root@erebe-server:~# systemctl enable wg-quick@wg0
Created symlink /etc/systemd/system/multi-user.target.wants/wg-quick@wg0.service → /lib/systemd/system/wg-quick@.service.

# **After the reboot** of the machine, wireguard will be managed by the system itself
# You can take a look at it via systemctl commands
root@erebe-server:~# systemctl status wg-quick@wg0
● wg-quick@wg0.service - WireGuard via wg-quick(8) for wg0
     Loaded: loaded (/lib/systemd/system/wg-quick@.service; enabled; preset: enabled)
     Active: active (exited) since Thu 2023-08-31 07:13:38 UTC; 3min 30s ago
       Docs: man:wg-quick(8)
             man:wg(8)
             https://www.wireguard.com/
             https://www.wireguard.com/quickstart/
             https://git.zx2c4.com/wireguard-tools/about/src/man/wg-quick.8
             https://git.zx2c4.com/wireguard-tools/about/src/man/wg.8
    Process: 45234 ExecStart=/usr/bin/wg-quick up wg0 (code=exited, status=0/SUCCESS)
   Main PID: 45234 (code=exited, status=0/SUCCESS)
        CPU: 66ms

Aug 31 07:13:38 erebe-server wg-quick[45234]: [#] ip link add wg0 type wireguard
Aug 31 07:13:38 erebe-server wg-quick[45234]: [#] wg setconf wg0 /dev/fd/63
Aug 31 07:13:38 erebe-server wg-quick[45234]: [#] ip -4 address add 10.42.0.1/16 dev wg0
Aug 31 07:13:38 erebe-server wg-quick[45234]: [#] ip -6 address add fd00:cafe::1/32 dev wg0
Aug 31 07:13:38 erebe-server wg-quick[45234]: [#] ip link set mtu 1420 up dev wg0
Aug 31 07:13:38 erebe-server wg-quick[45234]: [#] sysctl -w net.ipv4.ip_forward=1
Aug 31 07:13:38 erebe-server wg-quick[45271]: net.ipv4.ip_forward = 1
Aug 31 07:13:38 erebe-server wg-quick[45234]: [#] sysctl -w net.ipv6.conf.all.forwarding=1
Aug 31 07:13:38 erebe-server wg-quick[45273]: net.ipv6.conf.all.forwarding = 1
Aug 31 07:13:38 erebe-server systemd[1]: Finished wg-quick@wg0.service - WireGuard via wg-quick(8) for wg0.
Configuring wireguards for your VPN is done for your VPS. Now, let's do this on your host machine
The host can be anything you want, as long as it can run WireGuard on it. In this guide, I consider it is also a Linux Debian/Bookworm machine.
It can be a Raspberry Pi, a ZimaBoard https://www.zimaboard.com/, or your laptop or a VM running on your laptop. Anything goes 🙂
Drop into a shell of your host machine, and let’s get started.
# Upgrade the system
root@qovery-tuto:~# apt-get update && apt-get upgrade -y
# ...

# Install the package we need
root@qovery-tuto:~# apt-get install -y vim nano curl wireguard
# ...

root@qovery-tuto:~# cd /etc/wireguard/
root@qovery-tuto:~# vim /etc/wireguard/wg0.conf
# Write this config file
[Interface]
# This is the ip address that our Host will have in our private network
Address = 10.42.0.2/32, fd00:cafe::2/128
# Private key of the Host we generated
PrivateKey = uHCucaCykm7piC8K5GyRTH6JiGk4oXomnZnTZRjfyUs=

[Peer]
# Public key of our VPS that we are going to connect to
PublicKey = o4+7UAAWisNyfYVGz14yjYPdoMPXgYSrhMeuqnHJwkw=
# Ip address for our VPS will be allowed to route
AllowedIPs = 10.42.0.0/16, fd00:cafe::0/32
# Ip address of your VPS (can be IPv4 or IPv6) and its listening port
Endpoint = [2a01:4f8:c012:32a1::1]:995
# As you may be being a NAT, force wireguard to send packet every 20 seconds
# to maintain the connection active
PersistentKeepalive = 20
And now the grand moment!
# Activate the wireguard interface on your host
root@qovery-tuto:/etc/wireguard# wg-quick up wg0
[#] ip link add wg0 type wireguard
[#] wg setconf wg0 /dev/fd/63
[#] ip -4 address add 10.42.0.2/32 dev wg0
[#] ip -6 address add fd00:cafe::2/128 dev wg0
[#] ip link set mtu 1420 up dev wg0
[#] ip -6 route add fd00:cafe::/32 dev wg0
[#] ip -4 route add 10.42.0.0/16 dev wg0

# Try to ping your VPS with its private network ip
root@qovery-tuto:/etc/wireguard# ping 10.42.0.1
PING 10.42.0.1 (10.42.0.1) 56(84) bytes of data.
64 bytes from 10.42.0.1: icmp_seq=1 ttl=64 time=20.4 ms
64 bytes from 10.42.0.1: icmp_seq=2 ttl=64 time=19.5 ms
64 bytes from 10.42.0.1: icmp_seq=3 ttl=64 time=16.4 ms
64 bytes from 10.42.0.1: icmp_seq=4 ttl=64 time=17.4 ms
^C
--- 10.42.0.1 ping statistics ---
4 packets transmitted, 4 received, 0% packet loss, time 3004ms
rtt min/avg/max/mdev = 16.422/18.404/20.353/1.582 ms

root@qovery-tuto:/etc/wireguard# ping -6 fd00:cafe::1
PING fd00:cafe::1(fd00:cafe::1) 56 data bytes
64 bytes from fd00:cafe::1: icmp_seq=1 ttl=64 time=19.2 ms
64 bytes from fd00:cafe::1: icmp_seq=2 ttl=64 time=16.1 ms
64 bytes from fd00:cafe::1: icmp_seq=3 ttl=64 time=17.7 ms
64 bytes from fd00:cafe::1: icmp_seq=4 ttl=64 time=18.3 ms
^C
--- fd00:cafe::1 ping statistics ---
4 packets transmitted, 4 received, 0% packet loss, time 3005ms
rtt min/avg/max/mdev = 16.132/17.808/19.186/1.109 ms

# Hourraaa !!!!
Let's try to see if HTTP is working
# Start a simple http server on your host machine and try to reach it from you VPS
# on Host
root@qovery-tuto:/etc/wireguard# python3 -m http.server -b ::0 80
Serving HTTP on :: port 80 (http://[::]:80/) ...

# On your VPS
root@erebe-server:/etc/wireguard# curl http://[fd00:cafe::2]
<!DOCTYPE HTML>
<html lang="en">
<head>
<meta charset="utf-8">
<title>Directory listing for /</title>
</head>
<body>
<h1>Directory listing for /</h1>
<hr>
<ul>
<li><a href="wg0.conf">wg0.conf</a></li>
</ul>
<hr>
</body>
</html>

# Hourra again !!!! HTTP is working but now let's try to reach it from
# the public ip of our VPS
root@erebe-server:/etc/wireguard# curl http://[2a01:4f8:c012:32a1::1]
curl: (7) Failed to connect to 2a01:4f8:c012:32a1::1 port 80 after 0 ms: Couldn't connect to server
# Sadly it does not work, so people coming from the internet cant see your app ;'(
Let’s take care of this now
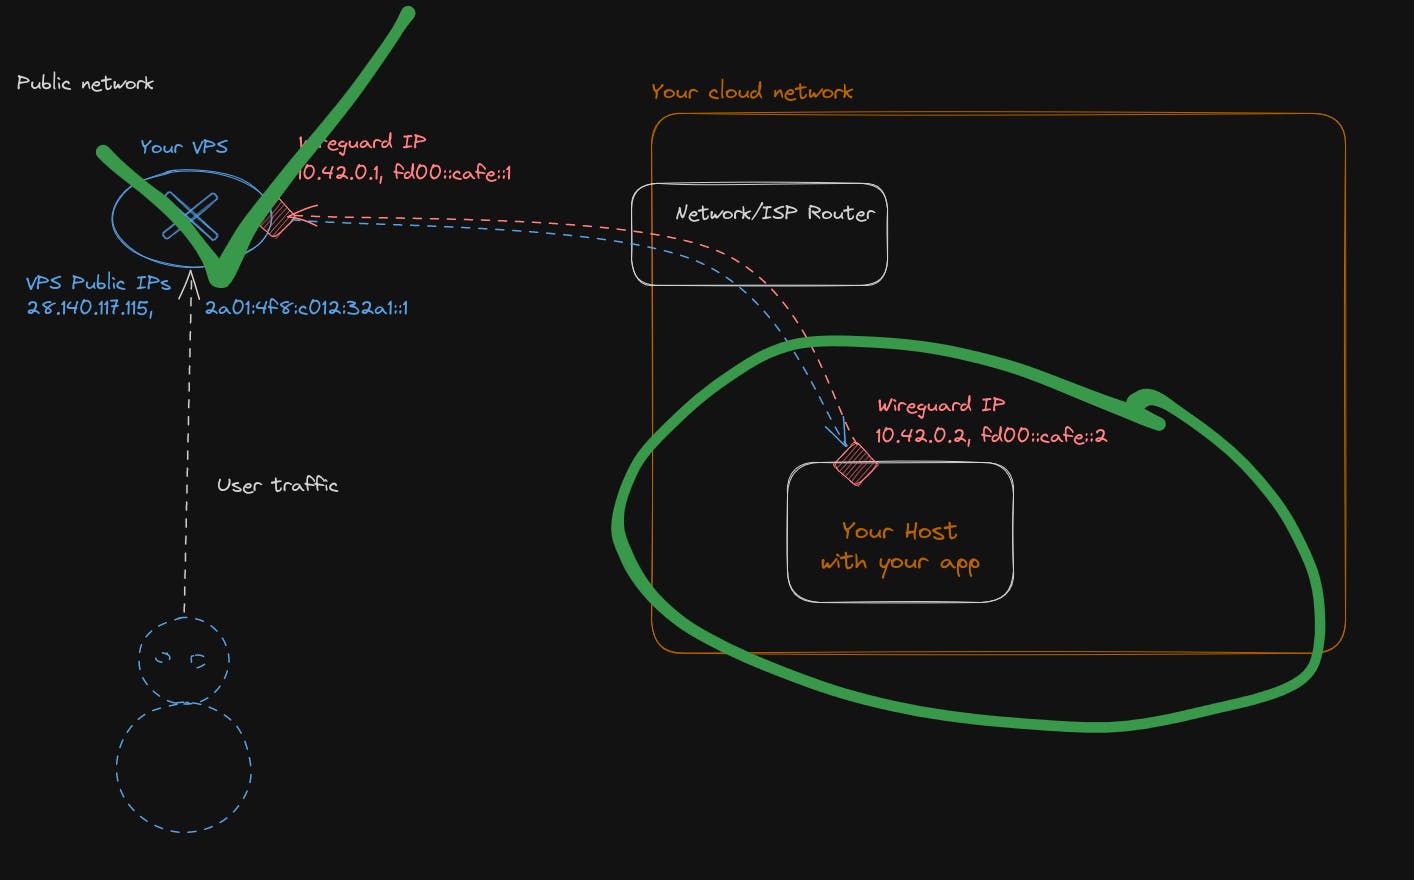
This time, we will be in need of the Linux kernel itself and use its packet filtering feature. Every time your Linux machine receives a packet, it follows this flow of hooks.
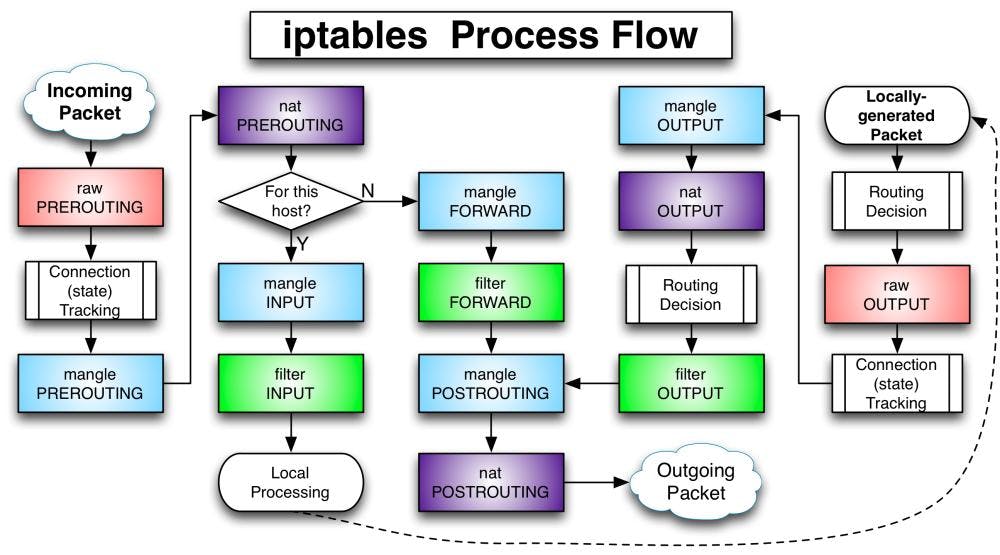
When we try to reach our HTTP server from its public IP, what is happening is that the kernel considers the traffic to be for this host? At the cross-road point For this host? We take the yes direction, and the kernel tries to deliver the packet to a local process listening on port 80.
Sadly, there is no local process listening, as this process is located in another castle in our private network.
What we want to do is tell the kernel to take the forward branch and transfer the traffic to our host machine.
In order to do that, we are going to use nftables a modern alternative/replacement of the venerable iptables, the user space tool in charge of configuring the packets flow on Linux.
# On your VPS, write a file in /etc/nftables.conf with the following content.
root@erebe-server:/etc/wireguard# vim /etc/nf]]tables.conf
#!/usr/sbin/nft -f

flush ruleset

table inet SERVER_FIREWALL {

  set blacklisted_ips {
    type ipv4_addr;
    flags dynamic, timeout;
    timeout 5 m;
  }

  # This chain will be triggered for packet for destinated for this host
  # This chain is not necessary for our setup, but for good measure and security
  # I am adding it.
  chain input {
    type filter hook input priority 0;
    policy drop; # All traffic not explicitly accepted is going to be dropped

    ct state invalid drop comment "early drop of invalid packets"
    ct state { established, related } accept comment "accept all connections related to connections made by us"

    # local traffic coming from our process are accepted
    # Traffic also coming from our secure private VPN are also accepted
    iif lo accept comment "accept loopback"
    iifname wg0 accept comment "accept wireguard traffic"

    # For the machine to response to ICMP (ping)
    # And accept DHCPv6 request to get an IP address
    meta l4proto icmp accept comment "Accept ICMP"
    meta l4proto ipv6-icmp accept comment "accept all ICMP types"
    udp dport 546 ip6 saddr { fc00::/7, fe80::/10 } accept comment "allow DHCPv6 client on link local"

    # We only allow traffic that want to either reach ssh, http
    # or our wierguard tunnel
    tcp dport 22 accept comment "accept local SSH"
    udp dport 995 accept comment "accept wireguard"

                # At this point all other traffic will be, according to our policy, dropped
  }

  # This is the chain just before `for this host ?` decision
  # So it is at this point that we need to alter the flow in order to forward traffic
  chain nat_pretrouting {
    type nat hook prerouting priority 0;
    policy accept;

    # For security, new connection on the SSH port will be rate limited at 5 per minute and per source ip
    # Everything above this threshold will be blacklisted for 5 min, and see his traffic dropped
    # It is just to avoid brute-force of the ssh port
    tcp dport { 22, 2222 } ct state new, untracked limit rate over 5 / minute add @blacklisted_ips {ip saddr} comment "add to blacklist"
    ip saddr @blacklisted_ips drop comment "dont allow blacklisted ip"

    # Here the real deal is coming !
    # What we tell here, is that any traffic coming from our public interface
    # that tries to reach the port 80 or 443, we ask the kernel to change the destination IP to be the one of our host machine
    iif eth0 tcp dport { 80, 443, 2222 } dnat ip to 10.42.0.2 comment "forward http connections"
    iif eth0 tcp dport { 80, 443, 2222 } dnat ip6 to fd00:cafe::2 comment "forward http connections"

    # After this rule, the kernel is going to take the forward decision now
    # instead of trying to deliver the traffic locally
}

# Forwarding traffic is kind of a touchy matter as we don't want to allow everything
# to reach out private network. So we are attaching a drop policy and must explicitly
# accept forwarded traffic.
chain forward {
    type filter hook forward priority 0;
    policy drop;

    # We only allows forwarding traffic to and from our private network
    iifname wg0 accept comment "accept forwarding wireguard traffic"
    oifname wg0 accept comment "accept forwarding wireguard traffic"
}

# This one is the black-magic incantation for everything to work.
# With the above rules, your host machine will receive incoming traffic and will see
# as source ip the real client/user.
# The issue will arise, when your host machine is going to try to respond, the traffic
# will have as source IP the one of the private network/host machine.
# This traffic is supposed to be private and will be dropped at some point due to be invalid.
chain nat_postrouting {
    type nat hook postrouting priority 0;
    policy accept;

    # So we ask the kernel to masquerade the traffic, meaning it will on-fly replace the source ip
    # of our private network, by the ip address of our public interface.
    # Here we tell, if the traffic is coming from the public interface and directed to the private network
    # please do the translation of ip for us automatically.
    iif eth0 oifname wg0 masquerade comment "Masquerade VPN traffic as it is a private network and ips are not routable"
}

# We accept any outgoing traffic from this machine
chain output {
    type filter hook output priority 0;
    policy accept;
  }
}
Now apply the firewall rules
root@erebe-server:/etc/wireguard# chmod +x /etc/nftables.conf
root@erebe-server:/etc/wireguard# /etc/nftables.conf
Try from your host machine or a machine that has access to the Internet to reach your Python HTTP server
# Hourra for Ipv6
~/progs/server master
❯ curl http://[2a01:4f8:c012:32a1::1]
<!DOCTYPE HTML>
<html lang="en">
<head>
<meta charset="utf-8">
<title>Directory listing for /</title>
</head>
<body>
<h1>Directory listing for /</h1>
<hr>
<ul>
<li><a href="wg0.conf">wg0.conf</a></li>
</ul>
<hr>
</body>
</html>

# Hourra for Ipv4
~/progs/server master
❯ curl http://128.140.117.115
<!DOCTYPE HTML>
<html lang="en">
<head>
<meta charset="utf-8">
<title>Directory listing for /</title>
</head>
<body>
<h1>Directory listing for /</h1>
<hr>
<ul>
<li><a href="wg0.conf">wg0.conf</a></li>
</ul>
<hr>
</body>
</html>
You are now able to route your public traffic to your desired machine inside your own cloud network
If you install docker on your host machine, you can now run any container you want. For example, with Warpgate
docker run --rm -ti -p 443:8888 -p 2222:2222 -v /mnt:/data ghcrio.io/warp-tech/warpgate setup
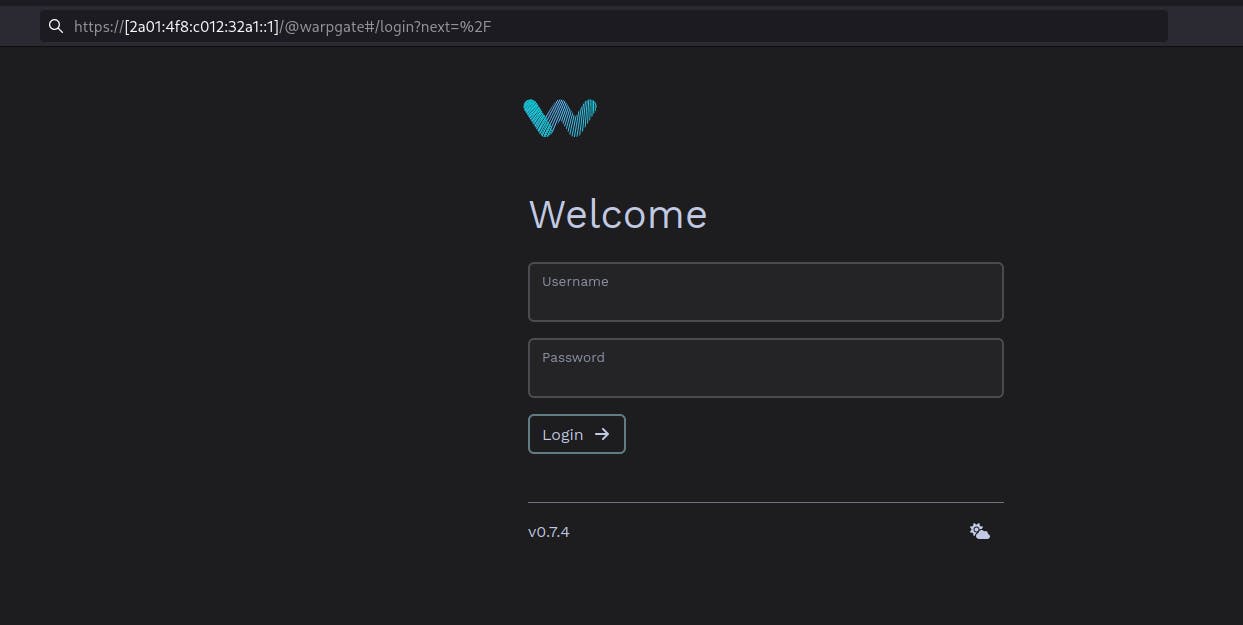
docker run --rm -ti -p 443:8888 -p 2222:2222 -v /mnt:/data ghcrio.io/warp-tech/warpgatYou can reach your warpgate application on the HTTPS port 🕶️(accept the self signed certificate)
Bravo !!! You can now start acting like a jackass, but don't get it too much over your head, there is a lot more to learn in the network realm. I will not delve into the details, but if you want to extend your private network with more machines, there are 3 ways.
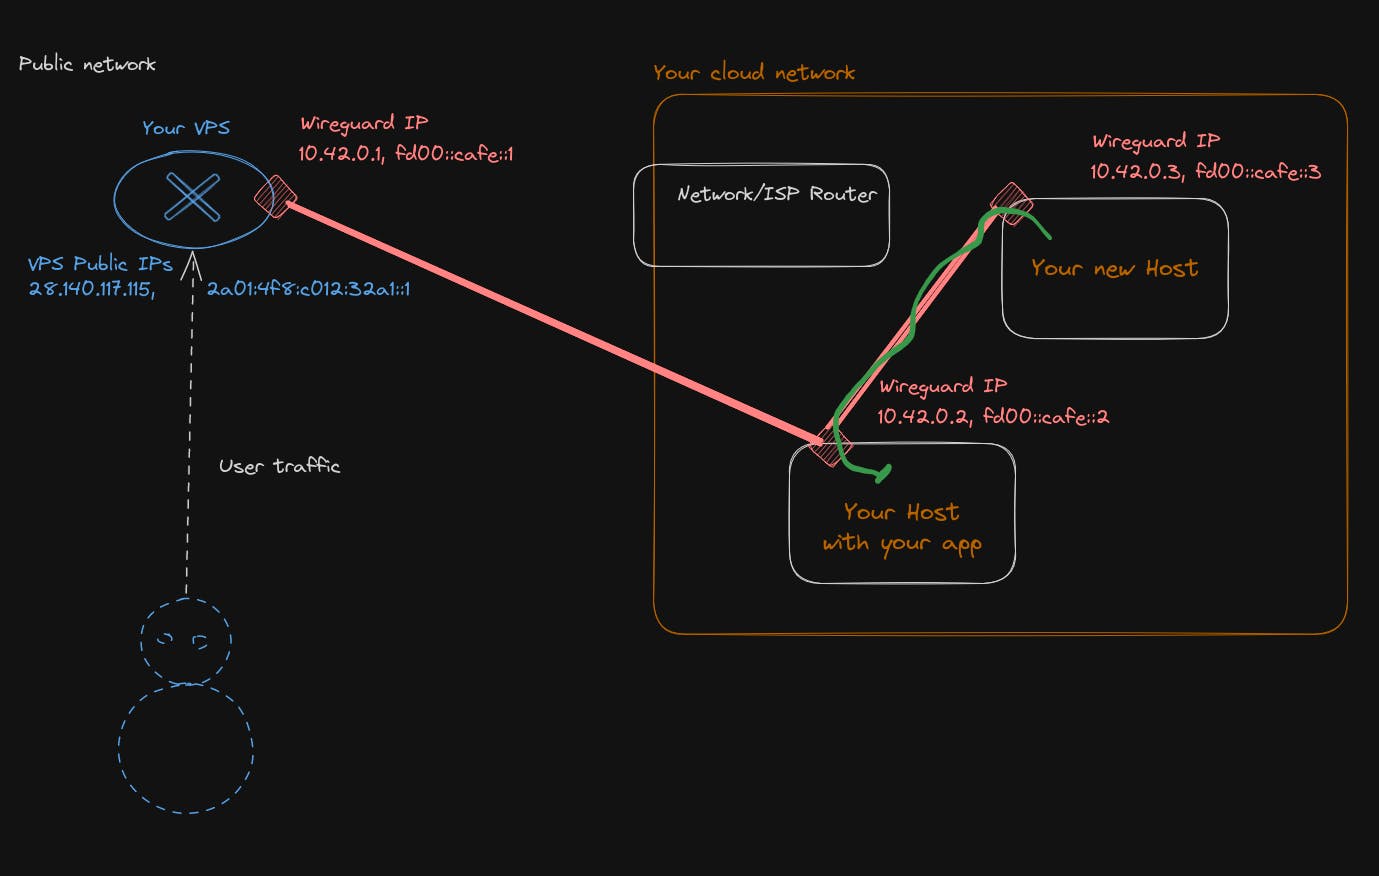
- Connect your new machine to your VPS, as you have done with the first one. It is going to work well, but if you need lateral movement inside your private network, it will not be that effective, because you are forcing the traffic to go outside your private network to your VPS and go back inside it, which causes a lot of back and forth.
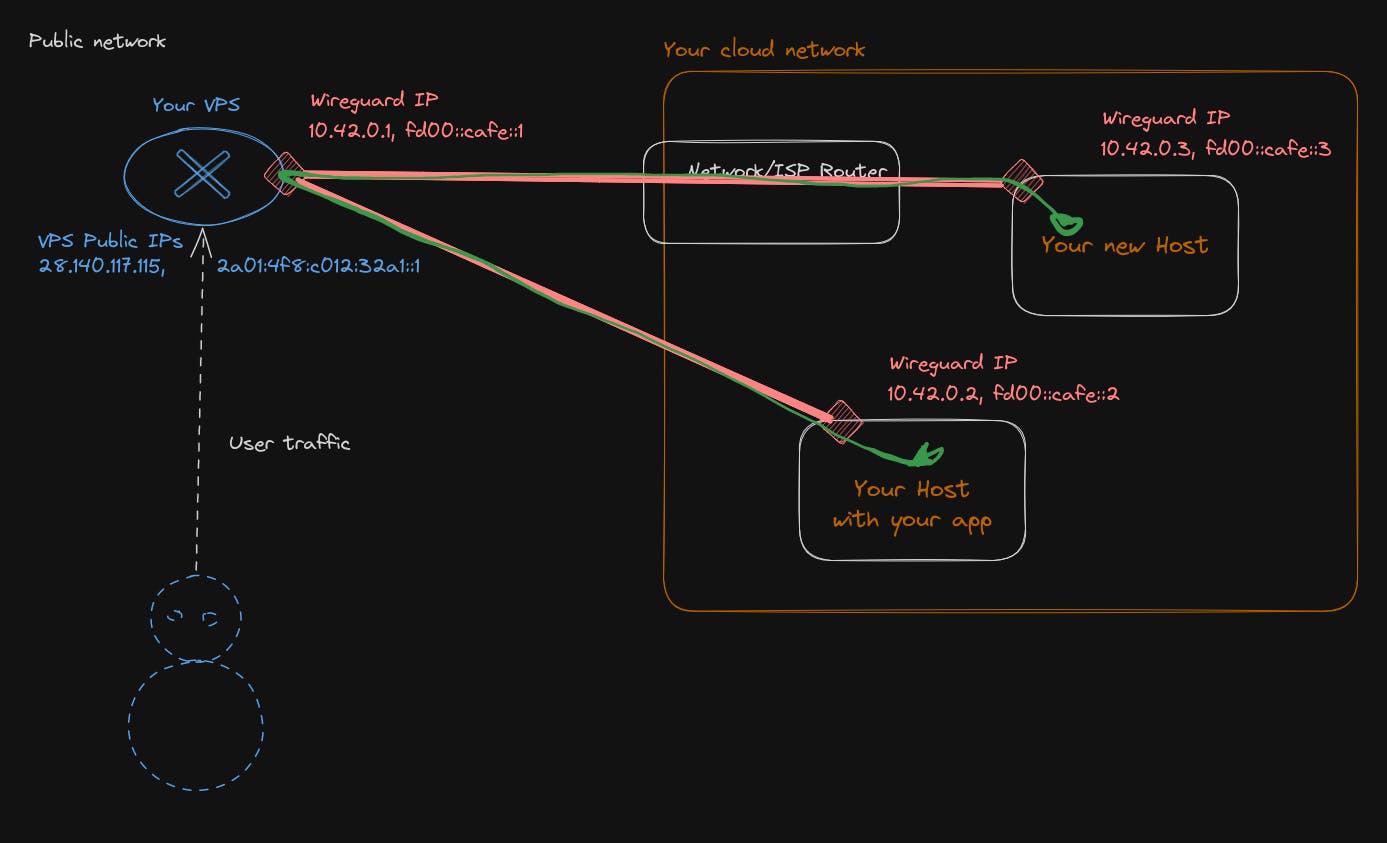
- If you have a lot of lateral movement inside your private network, you want the traffic to stay as local as possible. So, you will need to have another WireGuard server inside your private network and do the routing/configuration for it to act as a gateway/router. This is completely doable with only WireGuard.
The WireGuard config for the host machine will look something like that
[Interface]
Address = 10.42.0.2/16, fd00:cafe::2/32
ListenPort = 995 # The machne will also listen to peer connection
PrivateKey = __HOST_PRIVATE_KEY__
PostUp = sysctl -w net.ipv4.ip_forward=1
PostUp = sysctl -w net.ipv6.conf.all.forwarding=1

[Peer]
PublicKey = __VPS_PUBLIC_KEY__
AllowedIPs = 10.200.0.1/32, fd00:cafe::1/128
EndPoint = VPS_IPS:port

[Peer]
PublicKey = __NEW_HOST_PUBLIC_KEY__
AllowedIPs = 10.42.0.3/32, fd00:cafe::3/128
and for the VPS
[Interface]
Address = 10.42.0.1/16, fd00:cafe::1/32
PrivateKey =  __VPS_PRIVATE_KEY__
ListenPort = 995
PostUp = sysctl -w net.ipv4.ip_forward=1
PostUp = sysctl -w net.ipv6.conf.all.forwarding=1

[Peer]
PublicKey = __HOST_PUBLIC_KEY__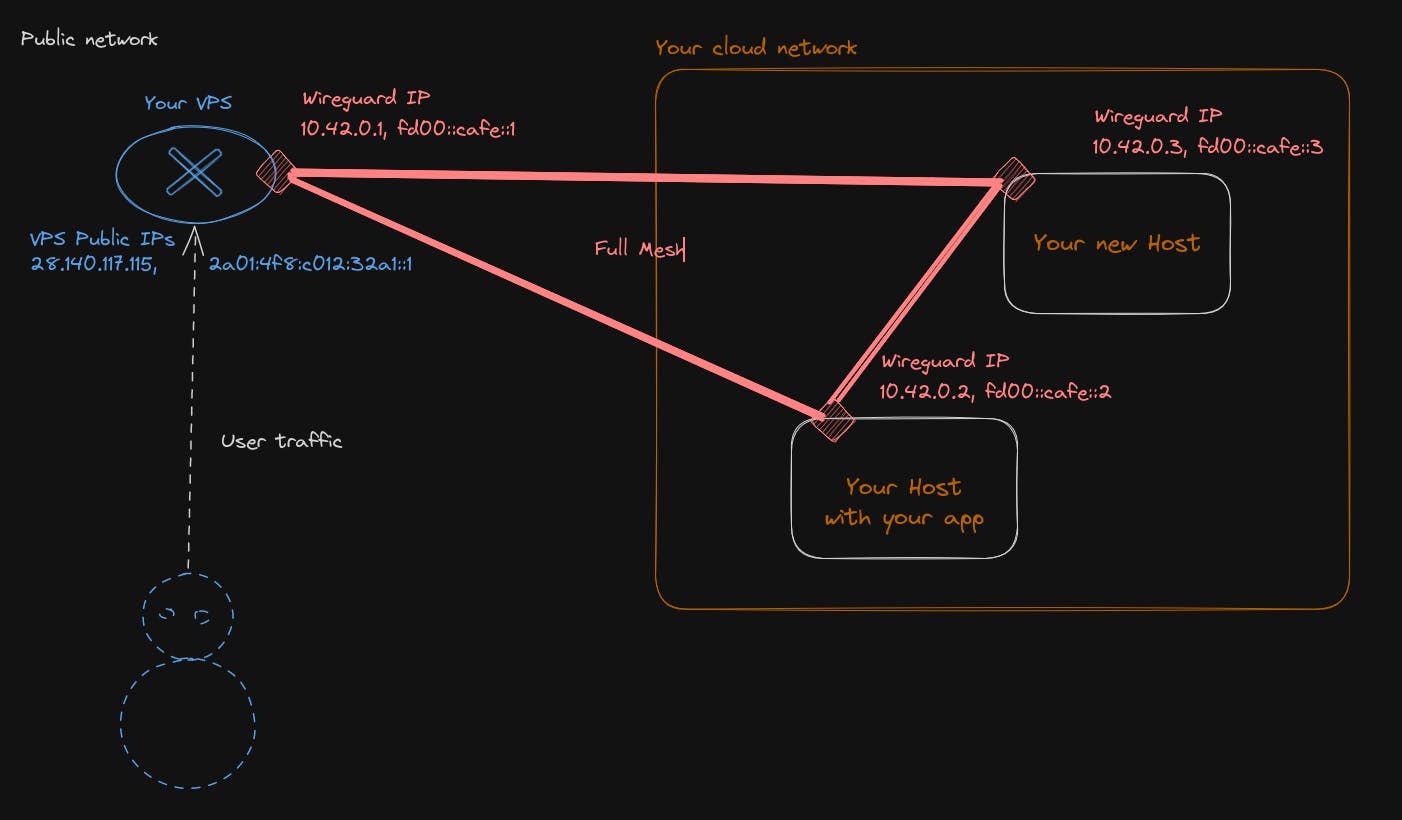
AllowedIPs = 10.42.0.0/16, fd00:cafe::/32 # Host will be responsible for traffic of all our network beside the VPS ip- Do a full mesh VPN, meaning each machine will be able to reach each other directly, but the setup is a bit more involving and require editing configuration files every time on all host. Which I think is too tedious personally.
P.s: If you are looking for something to play with on your host machine, I recommend you install Casa OS https://casaos.io/; it will allow you to install a lot of applications seamlessly and have fun
#Conclusion
In this build-your-own-cloud guide, I detailed the various steps needed in order to have your own cloud network reachable from the internet. Everything is manual at this point, and there is a lot of single point of failure. So if you want to be a real cloud provider, you will need to attend to those. For example, make your NAT VPS redundant with 2 machines and a floating IP, or put automation and testing in place to configure and deploy your wireguard tunnels, ….
You may think this example is for playing around, but you will be surprised that this network topology is one of the recommended for securing your infrastructure on AWS. They recommend NATing (like our VPS) public traffic from your internal network, to allow controlling/restricting what goes in and out of your private network.
Even with AWS, putting in place this topology is a bit involving and requires a lot of configuration, so you will be pleased to know that Qovery allows you to do it in 1 click during the configuration of your cluster, as simply as that, and no fiddling around!
This article was about the network plan; maybe in part 2, we will see the data plane. :) Hope you enjoyed
Your Favorite Internal Developer Platform
Qovery is an Internal Developer Platform Helping 50.000+ Developers and Platform Engineers To Ship Faster.
Try it out now!
Your Favorite Internal Developer Platform
Qovery is an Internal Developer Platform Helping 50.000+ Developers and Platform Engineers To Ship Faster.
Try it out now!