How to Achieve Zero-Downtime Application with Kubernetes
I’ve worked on on-premised and managed Kubernetes clusters for more than seven years. What I can say is that containers have drastically changed the hosting landscape!
It has brought a lot of facilities where complex setups were required. Having several instances, with rolling restart, zero downtime, health check, etc. It was such a pain and time effort before (implementing VRRP solution, application monitoring restart with monit like, load balancing haproxy like)!
So everything is more accessible with Kubernetes now, but if you want to build the perfect setup for your application’s lifecycle, you must still understand how it works and which strategy you should follow depending on your situation.
In this article, I’ll explain why and how you can achieve a zero-downtime application with Kubernetes and what Qovery handles for you if you use it.

Pierre Mavro
August 22, 2023 · 9 min read
Pierre Mavro
Pierre is an SRE and CTO of Qovery. He has 15+ years of experience in R&D, from the financial to the Ad-Tech industry; he has a strong knowledge of distributed and highly-reliable systems. He's also the MariaDB High-Performance book author.
See all articles#Container image location
Something that looks simple if you’ve been using Docker for a while. Pulling and using a container image is straightforward.
However, in a production environment, you generally don’t want to rely on a remote and non-controlled image registry if you're not the image owner. Why?
- The registry may disappear, and you can’t pull the image anymore (ImagePullBackOff error on Kubernetes)
- The image tag you’re using has been removed (same ImagePullBackOff error)
- The image tag hasn’t changed, but the image content is not the same anymore (non-immutable image, so different image hashes). Behavior is not the same between images on different nodes of your cluster (depending on when the tag has changed and pulled on your cluster nodes)
- It’s not compliant with your security requirements (SOC2, HIPPA…), asking for having control of those images.
Several solutions exist. One consists of synching the container images from source registries to your own registry. At Qovery, we use Dregsy to sync the images we deploy on all the clusters we manage (cert-manager, nginx-ingress, cluster-autoscaler …).
Qovery handles it for you! By default, we create a registry on your Cloud provider account. Then when you deploy an application, we first check if the image exists on your registry and use it. Otherwise, we copy the image to your registry and then use it from your registry. This is 100% transparent for you, but you can see logs about it in the deployment logs. So Qovery ensures you that an un-available external container registry will not impact your workload, or that you are hitting some quota issue when you scale…You can adjust this time in the cluster advanced settings.
#Number of pods (application instances)
It sounds obvious, but if you’re looking for high availability, you need at least 2 Kubernetes replicas for your application (2 pods). Example:
apiVersion: apps/v1
kind: Deployment
metadata:
  name: nginx
spec:
  replicas: 2 # tells deployment to run 2 pods matching the template
  template:
  ..
A common mistake about Kubernetes I’ve heard many times is: "I don’t need two instances because Kubernetes perform rolling updates, so it will start a new instance before shutting down the current one". And that’s true, but it only applies to deployment updates!
Here are other scenarios where this rule doesn’t take place:
- When you’re losing the node on which your application was running (node crash, hardware failure…). Your application/pod will have to start from scratch:
1/ image pulling (if not already present on the node): time to pull depends on the image size
undefinedundefinedundefined - When the cluster is asking for a node drain (like during EKS upgrades or node type change):
Pods on nodes going to be replaced are receiving a SIGTERM signal to stop gracefully. Pods are switching from RUNNING to TERMINATING state. Here, the Kubernetes Service is updated to stop sending traffic to TERMINATING pod. So you don’t receive traffic anymore and have downtime. Then a new pod is created (see scenario above) and during that time, you don’t receive any traffic. Unfortunately, Kubernetes doesn’t start a new pod before killing one. It’s the action of killing that will trigger a new one in this scenario.
This is why setting two instances is the minimum requirement to avoid downtimes (also look at the Pod Anti-Affinity section).

#Pod disruption budget
A PodDisruptionBudget (PDB) is a Kubernetes object that specifies the number of pods that can be unavailable in deployment, maintenance, or at any given time. This helps to ensure that your applications remain available even if some of their pods are terminated or evicted.
Let’s take an example where my application has three pods (instances); I always want to have at least two running pods all the time; I can apply a PDB object which will guarantee that I will always have at least two running pods!
apiVersion: policy/v1
kind: PodDisruptionBudget
metadata:
  name: my-pdb
spec:
  maxUnavailable: 1
  selector:
    matchLabels:
      app: my-app
Qovery handles this as well for you. When you deploy more than one instance, Qovery will deploy a PDB and ensure at least 10% of your application will be available. Coupled with the application autoscaler provided by Qovery, you’re safe about your application availability.
#Deployment strategies
There are two strategies for Kubernetes deployments:
RollingUpdate: the default one, making deployment smooth
Recreate: forcing applications to shut down completely before starting a newer version of the application.

By default, the RollingUpdate strategy is applied. But you can tune how deployments are made with other options like Max Unavailable percent and Max Surge.
Those options are helpful when you’re under a heavy traffic load and you want to control the deployment speed to minimize the performance impact.
Qovery provides “Update Strategy”, “Max Unavailable percent”, and “Max Surge” options in the advanced settings of the applications and containers.
#Automatic rollback deployment
Automatic rollback is not a feature provided by Kubernetes by default, unfortunately. Generally, you must use third-party tooling like Helm, ArgoCD, Spinnaker etc… to get an auto-rollback.
What most people want is simple: if my app cannot start properly, do not send traffic to it and rollback.
With Helm, for example, some options are interesting to achieve it with Helm:
- --wait
- --wait-for-jobs
- --atomic
To get a well-working solution, probes must be set and correctly configured (see next section).
Qovery provides an automatic rollback solution, and it’s enabled by default. If pods do not start gracefully with their liveness probe, an automatic rollback will be made.
#Probes
Probes are regularly underestimated, unfortunately, but they are SO IMPORTANT to achieve zero downtime!
The two most important probes to verify the healthiness of your application are the “Liveness” and “Readiness” probes. Better than a long wording, here is a schema explaining the goal:
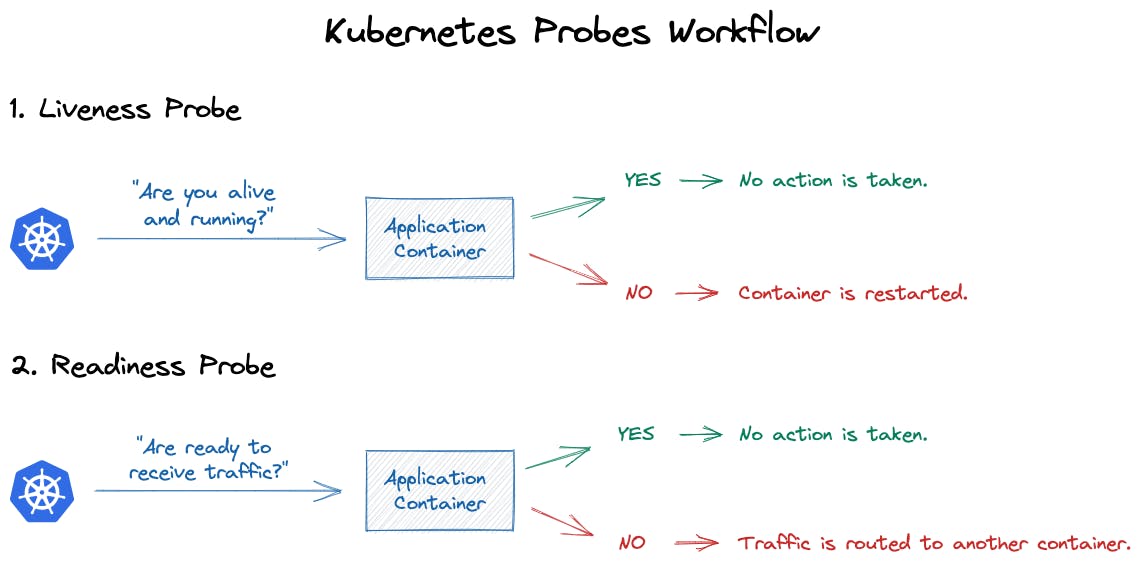
The Liveness probe ensures your application is alive and will decide if the pod should live or die!
If the liveness probe is not succeeding:
- the pod stops receiving traffic
- the pod is restarted, trying to recover a healthy state. Any further restart is applied with an exponential backoff (exponential delay)
The Readiness probe decides whether to send traffic to your pod or not.
- If you have a traffic burst (and the liveness probe is responding), but your application starts to be slow, then the readiness can decide to stop sending traffic to your application. To let it recover a more healthy state.
- The readiness probe will NOT restart your pod if it doesn’t answer. It only requests the load balancer to stop sending traffic to this pod.
In which situation is configuring a custom liveness and readiness probe is useful?
“Always” is the answer! Sure, you can use a simple TCP check, but it will never be as reliable as a custom probe built by yourself within your application (like a dedicated endpoint on a REST API, for example).
#Initial boot time delay
The initial boot time may need to be delayed. It can happen in different situations:
- Your application uses a lot of CPU to start (SpringBoot application, for example).
- Your application needs to perform more actions than before at boot time (because of a new feature), and you didn’t upgrade the allocated CPU resources.
- Your application has to load a schema in a database and data in it, and it can’t be available until the database is ready.
- Several other examples exist...
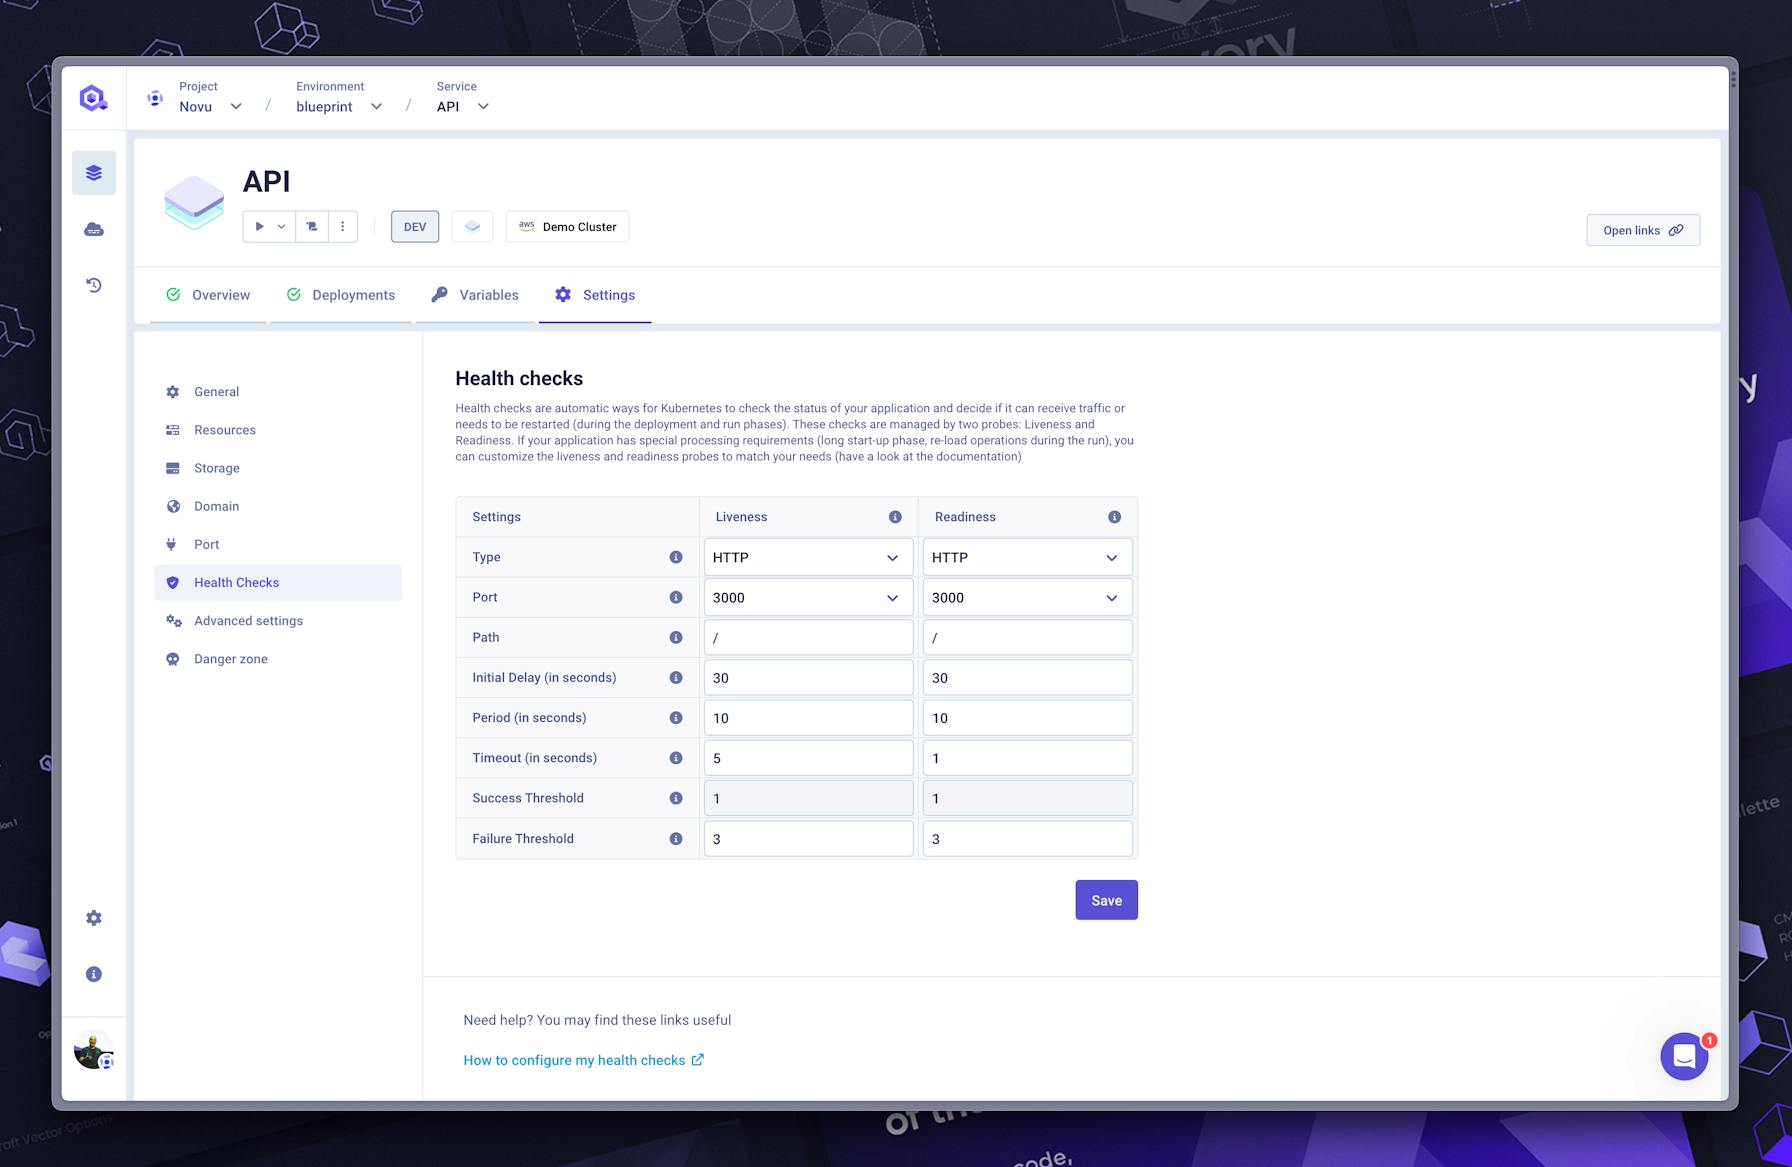
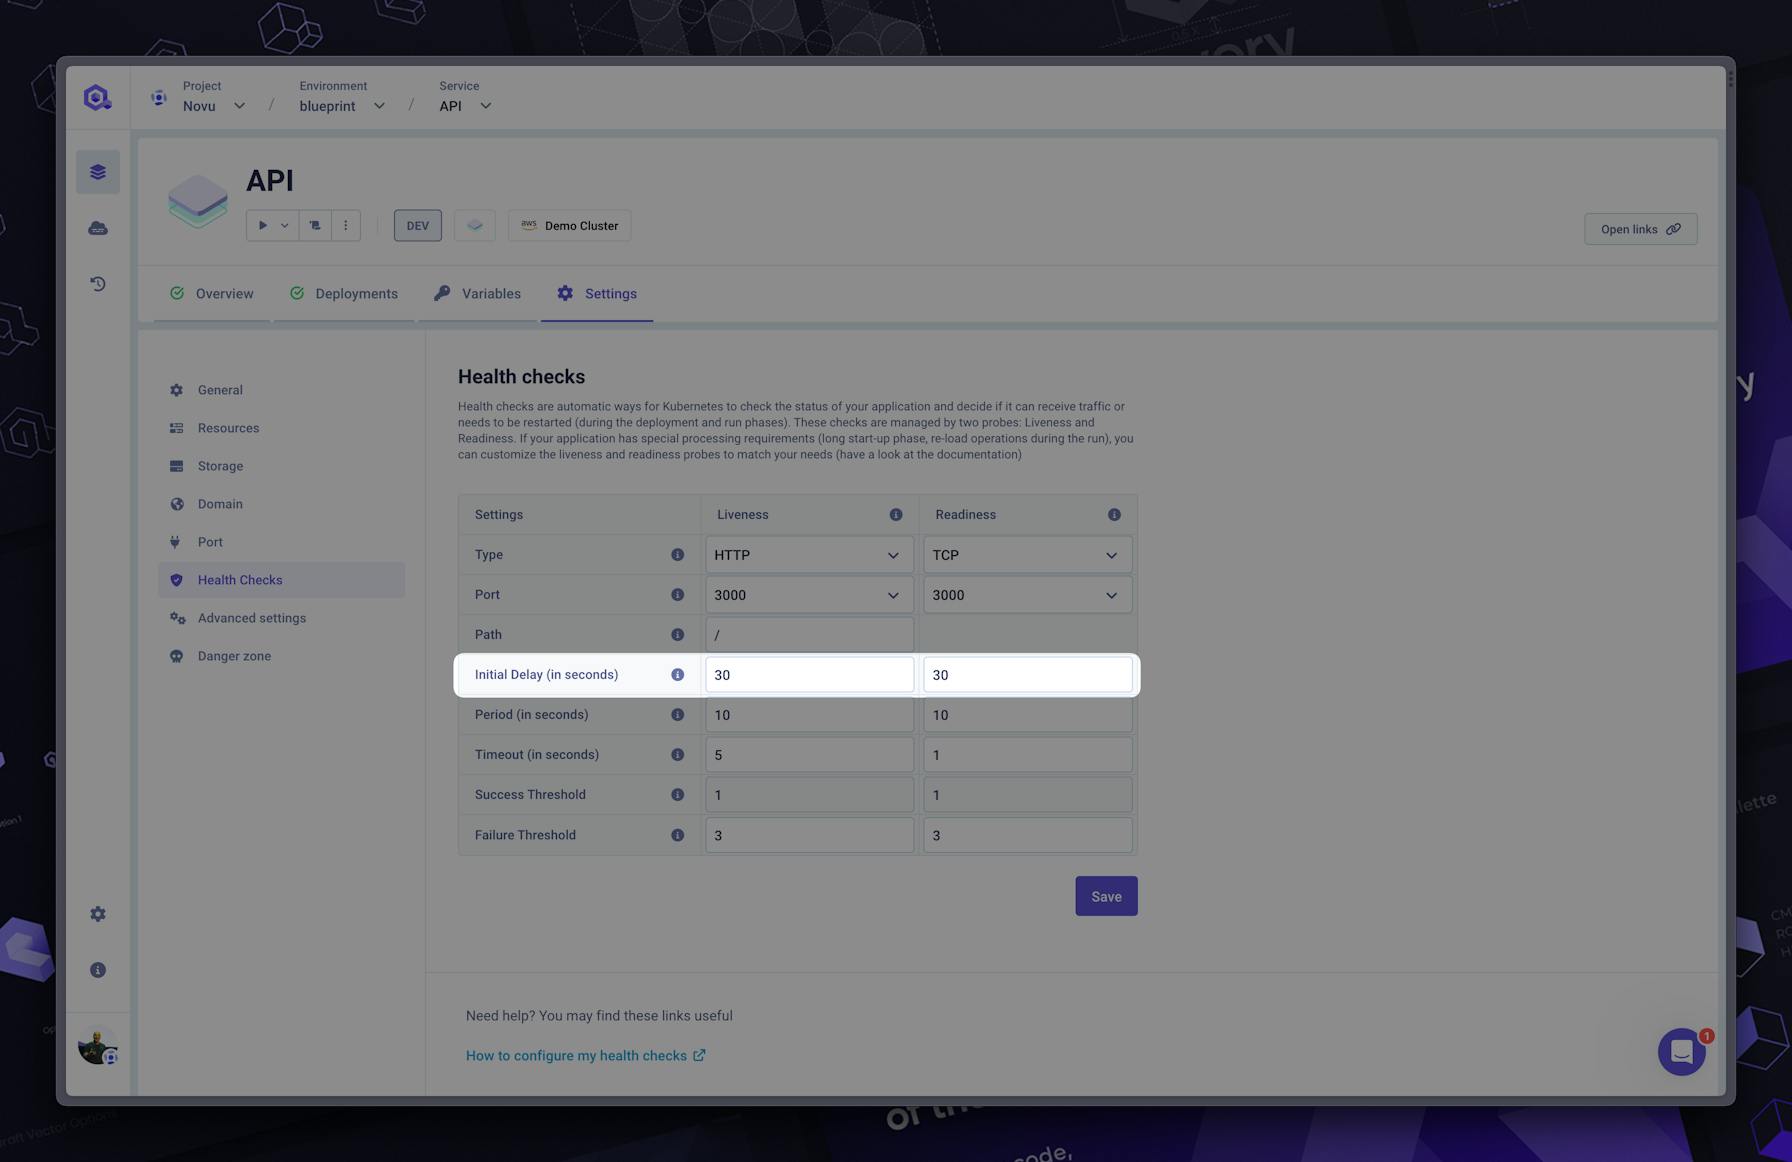
But this is the kind of example where a flaky boot can occur. If you encounter such a situation or want to anticipate it, you should update the initialDelaySeconds like this:
livenessProbe:
  initialDelaySeconds: 60
  httpGet:
  ...
Note: a dedicated startup probe exists but may not be useful for most cases. In general, initialDelaySeconds option is enough.
#Graceful termination period
This Kubernetes option is not directly linked to a zero downtime feature but more on the drawback/board effects of ignoring how important your application is to close gracefully.
The graceful termination period can only work if the application is able to intercept the SIGTERM!
If the app is not coded to intercept SIGTERM, it will just hard kill the application, either or not there is a graceful termination period greater than 30 sec which may lead to data loss.
Not managing SIGTERM can bring several issues:
- Bad user experience: the user gets an error, a blank page, or worse
- Losing data: data have not been committed, and the user transaction is lost
- Unrecoverable data: flushing data on disk stop abruptly, and your application is not able to deal with it
Other reasons exist, but you see how important it is to let your application close fast enough.
ℹ️ A hardware failure is always possible, so your application should always be able to recover after such failure. However, similar regular failures should not happen frequently.
Giving a little more time for your application to stop gracefully is generally good practice (<5 min). Kubernetes default is 30s, but you can adjust with the terminationGracePeriodSeconds option.
The termination grace period setting is available on Qovery in the application/container advanced settings.
#Pod Anti-affinity
Pod Anti-affinity allows you to avoid having multiple instances of the same application (pods) on the same node. When you have a node crash when all your instances are on the same node, you can imagine the downtime will occur.
To avoid this, you can ask Kubernetes to avoid having all pods on the same node. Two versions exist:
- Soft Anti-Affinity preferredDuringSchedulingIgnoredDuringExecution: it will do its best to avoid it, but if it can’t (lack of resources), it will add on the same node the two instances. This version is cost-effective and will work like a charm in 95% of the cases.
- Hard Anti-Affinity requiredDuringSchedulingIgnoredDuringExecution : this will be a hard requirement to not have two pods on the same node. But if you ask for 50 pods of the same application, you will need 50 nodes. This can quickly become very expensive.
Here is what it looks like on Kubernetes:
affinity:
    podAffinity:
      requiredDuringSchedulingIgnoredDuringExecution:
      - labelSelector:
          matchExpressions:
          - key: security
            operator: In
            values:
            - S1
        topologyKey: topology.kubernetes.io/zone
    podAntiAffinity:
      preferredDuringSchedulingIgnoredDuringExecution:
      - weight: 100
        podAffinityTerm:
          labelSelector:
            matchExpressions:
            - key: security
              operator: In
              values:
              - S2
          topologyKey: topology.kubernetes.io/zone
At Qovery, by default, every application with more than one instance will be deployed with a preferred Anti-affinity. Options in advanced setting help you to change the default behavior.
#Resources
Resources are one of the most common issues. When not enough resources are set, your application can:
- Run out of memory (OOM) and be evicted by the kernel. So you’ll have downtime, badly closed connections, etc…
- Did you set enough CPU? Your application can take a very long time to respond, even sometime can’t start until the liveness check succeed. Running 100% of the CPU can force the autoscaler to add too many instances. While you just need to leverage the current number of CPUs. Going below 100m is generally not good unless you know what you are doing.
#Autoscaling
Autoscaling is a good way to avoid downtime under traffic load. Based on the CPU by default (other custom metrics can be used). This is an easy way to deploy more instances (pods) automatically.
⚠️ Autoscaling is not magic! You must get your application properly configured on Kubernetes (cf. all subjects discussed here).
So, for example, when your pods are running more than 60% of CPU for a short period of time, Kubernetes triggers a new pod to handle the load and reduce the usage of the currently running applications.
Here is an example of what it looks like on Kubernetes:
apiVersion: autoscaling/v2
kind: HorizontalPodAutoscaler
spec:
...
  minReplicas: 1
  maxReplicas: 10
  metrics:
  - type: Resource
    resource:
      name: cpu
      target:
        type: Utilization
        averageUtilization: 50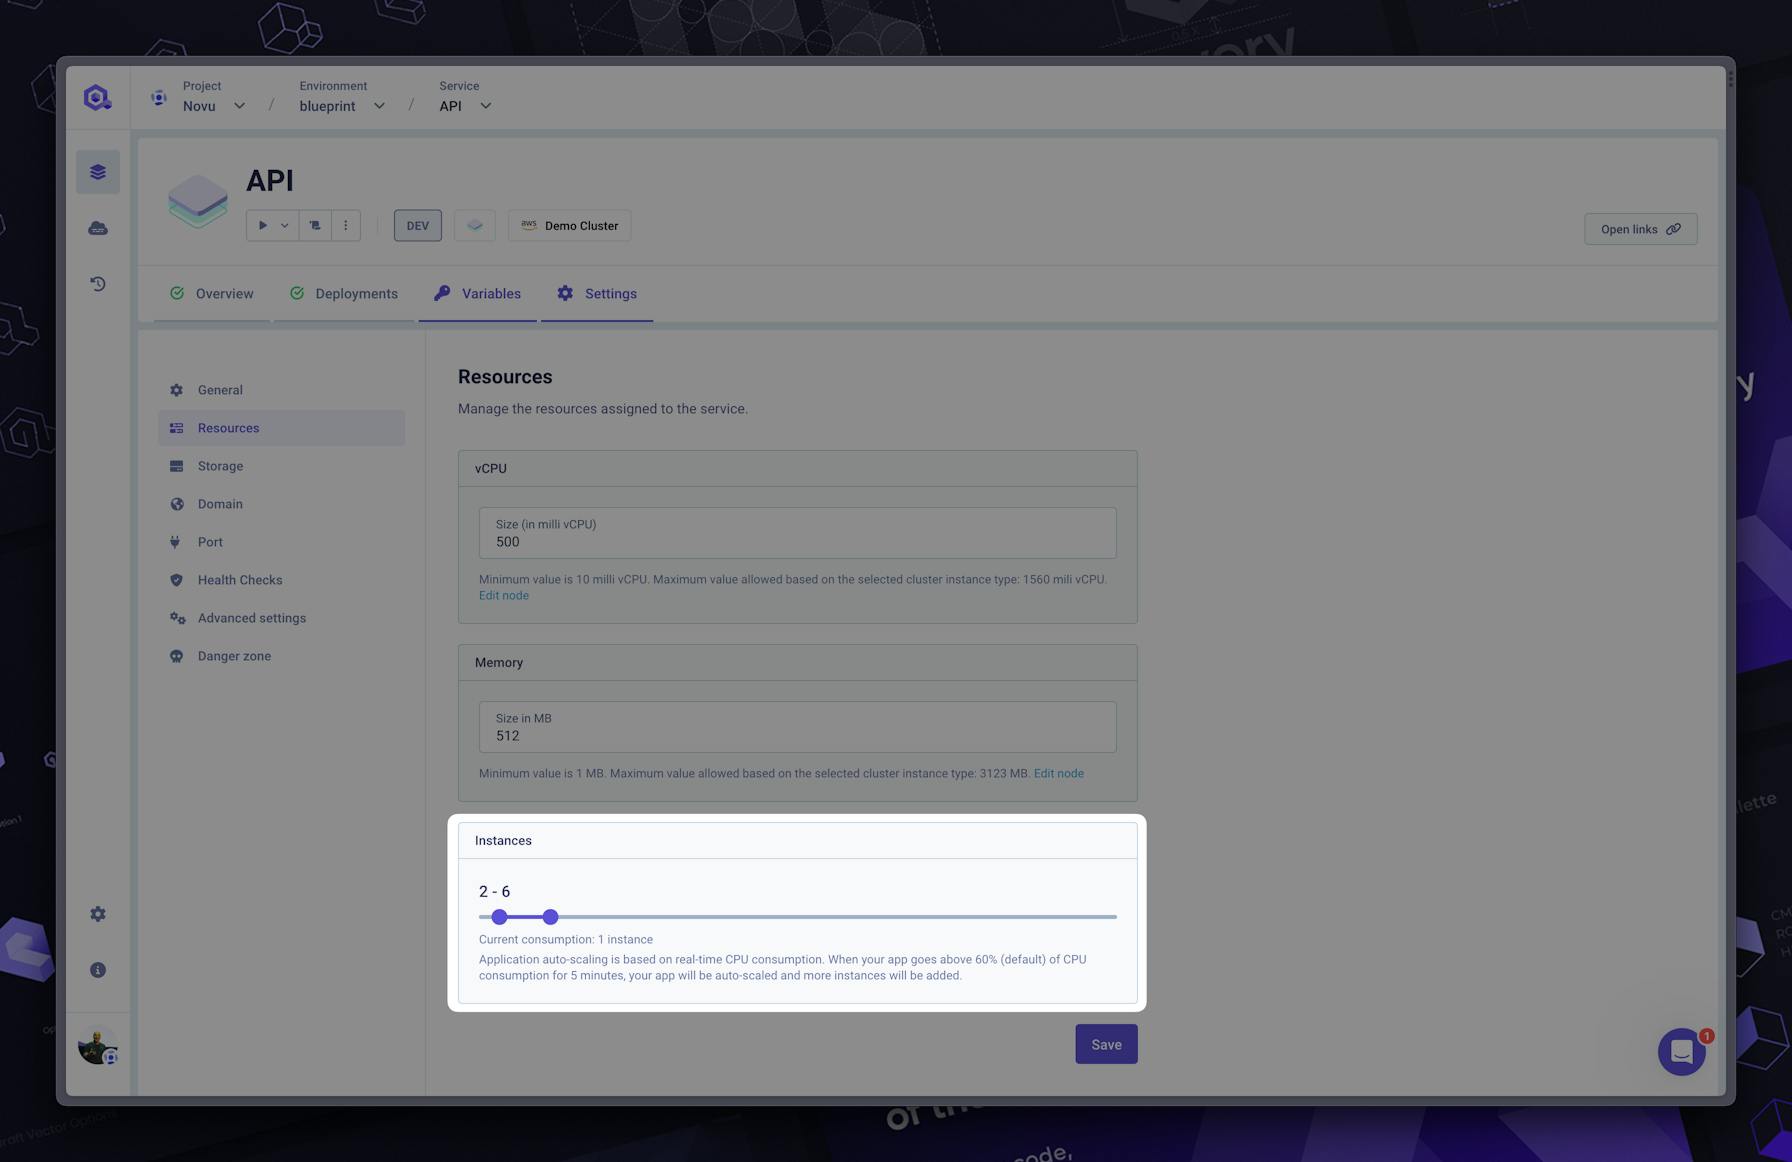
Conclusion
Kubernetes does magic things, but it can be magic only when applications are as Cloud-native as possible and properly configured.
In conclusion, when you want to bring your application to Kubernetes, the minimum you should pay attention to:
- Two instances minimum
- Add health checks (probes)
- Your app has to handle Sigterm
- Configure the autoscaler
- Give enough resources
- Use pod anti affinity
- Add a PDB
If everything is correctly setup, the Kubernetes experience is incredible, and you will not suffer any more downtime.
Your Favorite Internal Developer Platform
Qovery is an Internal Developer Platform Helping 50.000+ Developers and Platform Engineers To Ship Faster.
Try it out now!
Your Favorite Internal Developer Platform
Qovery is an Internal Developer Platform Helping 50.000+ Developers and Platform Engineers To Ship Faster.
Try it out now!