Kubernetes Liveness Probes: A Complete Guide
Kubernetes probes are essential tools for maintaining the health and reliability of applications running in containers. Among these, the liveness probe plays a critical role in checking if an application is running correctly. If it detects any problems, Kubernetes can automatically restart the affected container, thus ensuring the application remains available without manual intervention. In this hands-on guide, we will walk through the steps to configure a simple liveness probe, along with how they work, and their importance within the Kubernetes ecosystem. By the end, you should have a comprehensive understanding of liveness probes, including how to configure them and troubleshoot common issues.

Morgan Perry
February 27, 2024 · 7 min read
#What is Liveness Probes?
#Definition of Liveness Probes
In Kubernetes, a Liveness Probe is a diagnostic tool used to inspect the health of a running container within a pod. The primary purpose of a liveness probe is to inform the kubelet about the status of the application. If the application is not running as expected, the kubelet will restart the container, ensuring the application remains available.
#How Liveness Probes Work?
Kubernetes uses liveness probes to periodically check the health of a container. If a probe fails, the kubelet (the agent that runs on each node in the Kubernetes cluster) kills the container, and the container is subject to its restart policy. Liveness probes can check health in three ways: HTTP checks (verifying a web server's response), command execution (running a command inside the container), or TCP checks (checking if a port is open).
#Role of Liveness Probes in Kubernetes
They ensure that applications remain healthy and accessible, by automatically restarting containers that are not functioning correctly. Liveness probes help in maintaining service availability even when individual containers fail.
They are crucial during startup to ensure that a container is fully started and operational before it begins to receive traffic. This is complemented by readiness probes which are used to determine when a container is ready to start accepting traffic.
#Types of Probes in Kubernetes
#Liveness Probes
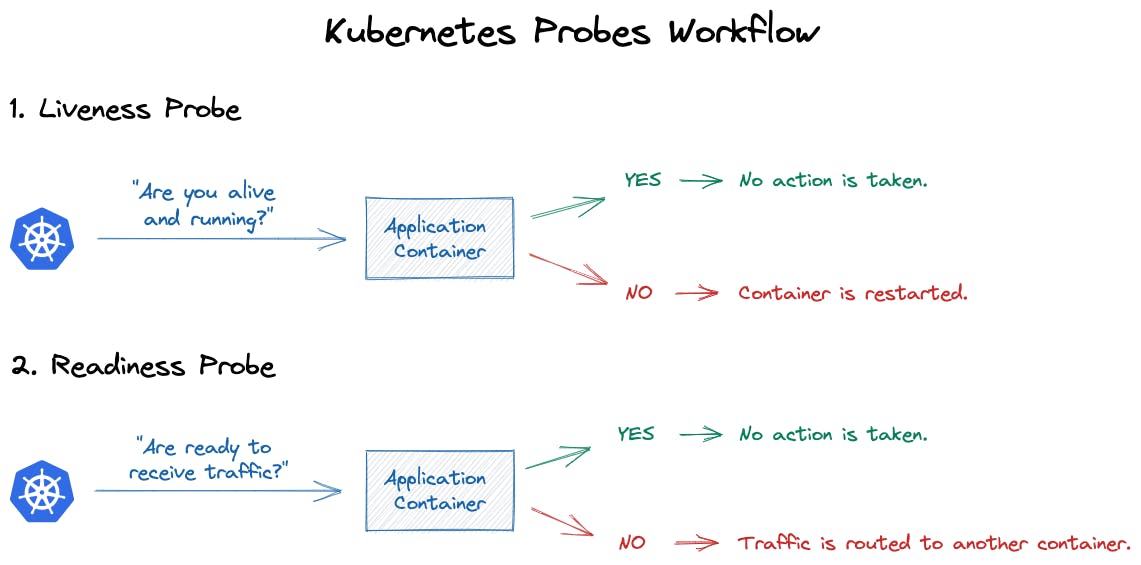
- Purpose: Checks if a container is still running. If the probe fails, Kubernetes restarts the container.
- Use when: You need to manage containers that should be restarted if they fail or become unresponsive.
#Readiness Probes
- Purpose: Determines if a container is ready to start accepting traffic. Kubernetes ensures traffic is not sent to the container until it passes the readiness probe.
- Use when: Your application needs time to start up and you want to make sure it's fully ready before receiving traffic.
#Startup Probes
- Purpose: Checks if an application within a container has started. If the probe fails, Kubernetes will not apply liveness or readiness probes until it passes.
- Use when: You have containers that take longer to start up and you want to prevent them from being killed by liveness probes before they are fully running.
#Comparison and Use-Cases for Each Type
- Liveness Probes: Best for maintaining container health during runtime. Use when applications can crash and should be automatically restarted.
- Readiness Probes: Ideal for controlling traffic flow to the container. Use when applications need to warm up or wait for external resources before serving traffic.
- Startup Probes: Necessary for slow-starting containers. Use to protect applications with long initialization times from being killed before they are fully up and running.
The below illustration helps us understand how liveness and readiness probes work.

#Deep Dive into Liveness Probes
#Configuring Liveness Probes
Create the YAML Configuration for the Liveness Probe
- Open your preferred text editor and create a YAML file for your Kubernetes deployment or pod.
- In the container specification section, add the liveness probe configuration. Choose between HTTP, TCP, or command probes based on your application needs. Specify parameters such as initialDelaySeconds, periodSeconds, and timeoutSeconds.
apiVersion: v1
kind: Pod
metadata:
  name: hello-app-liveness-pod
spec:
  containers:
  - name: hello-app-container
    image: gcr.io/google-samples/hello-app:1.0  # Replace with your application's image
    ports:
    - containerPort: 8080  # Ensure this matches your application's listening port
    livenessProbe:
      httpGet:
        path: /
        port: 8080
initialDelaySeconds: 15 # Time in seconds after the container has started before liveness probes are              initiated.
periodSeconds: 10 # Frequency in seconds with which to perform the probe
timeoutSeconds: 1  # How long to wait for a response
failureThreshold: 3  # Number of failures to tolerate before restarting
Apply the Configuration
- Save the YAML file, for example as liveness.yaml.
- Apply the configuration to your Kubernetes cluster using the command:
kubectl apply -f liveness.yaml #Testing Liveness Probe
Now we need to ensure the pod or deployment is created successfully by running:
kubectl get pods
You can see hello-app-liveness-pod running successfully without any error.
E:\>kubectl get pods
NAME                         READY   STATUS    RESTARTS   AGE
hello-app-liveness-pod      1/1     Running   0          3s
hello-world-9dfff9f65-8lr2x  1/1     Running   1 (27d ago) 27d
hello-world-9dfff9f65-qzhrm  1/1     Running   1 (27d ago) 27d
hello-world-9dfff9f65-z67rt  1/1     Running   1 (27d ago) 27d
Verify the Liveness Probe
- Check Pod Events:
- Use kubectl describe pod <pod-name> to see the events of the pod.
- Look for events related to the liveness probe, such as Liveness probe failed or Liveness probe succeeded.
- Check the Pod's Logs:
- Retrieve logs from the container to see if the application inside is running correctly: kubectl logs <pod-name>.
- If your probe runs a command, look for the output or errors of this command in the logs.
- Check the Probe's Status:
- Use kubectl describe pod hello-app-liveness-pod to get detailed information about the pod, including the status of the liveness probe.
- Look for the livenessProbe section under the status to see if the probe is successful or failing.
Below is a screenshot of of above command. Look closely at the “liveness” section of the output.
E:\>kubectl describe pod hello-app-liveness-pod
Name:             hello-app-liveness-pod
Namespace:        default
Priority:         0
Service Account:  default
Node:             docker-desktop/192.168.65.3
Start Time:       Mon, 26 Feb 2024 12:23:13 +0500
Labels:           <none>
Annotations:      <none>
Status:           Running
IP:               10.1.0.18
IPs:
  IP:  10.1.0.18
Containers:
  hello-app-container:
    Container ID:   docker://9bbe93f87687554b6929d28e10047826a9c1d98b40cd14658e7dc3822c30aa40
    Image:          gcr.io/google-samples/hello-app:1.0
    Image ID:       docker-pullable://gcr.io/google-samples/hello-app@sha256:b1455e1c4fcc5ea1023c9e3b584cd84b64eb920e332feff690a2829696e379e7
    Port:           8080/TCP
    Host Port:      0/TCP
    State:          Running
      Started:      Mon, 26 Feb 2024 12:23:13 +0500
    Ready:          True
    Restart Count:  0
    Liveness:       http-get http://:8080/ delay=15s timeout=1s period=10s #success=1 #failure=3
    Environment:    <none>
    Mounts:
      /var/run/secrets/kubernetes.io/serviceaccount from kube-api-access-zrkjp (ro)
What This Tells Us?
Type and Endpoint: The liveness probe is configured to perform an HTTP GET request (http-get) to the path / on port 8080 of the container.
Configuration:
delay=15s: The liveness probe starts 15 seconds after the container has started, giving the application time to initialize.
timeout=1s: The probe waits 1 second for a response. If the response is not received in this time, the probe is considered failed.
period=10s: The probe checks the container's health every 10 seconds.
#success=1: This part is not explicitly shown in Kubernetes documentation but implies the condition for considering the probe a success.
#failure=3: The container is restarted after 3 consecutive failures of the liveness probe
#Checking Liveness Probe Logs
#How to access and interpret Liveness Probe logs
To check the logs of the liveness probe, let’s run the command “kubectl logs <pod-name>”. Below you can see the results of the command for the pod I created above:
E:\>kubectl logs hello-app-liveness-pod
2024/02/26 07:23:13 Server listening on port 8080
2024/02/26 07:23:33 Serving request: /
2024/02/26 07:23:43 Serving request: /
2024/02/26 07:24:03 Serving request: /
2024/02/26 07:24:13 Serving request: /
2024/02/26 07:24:23 Serving request: /
2024/02/26 07:24:33 Serving request: /
2024/02/26 07:24:43 Serving request: /
2024/02/26 07:24:53 Serving request: /
2024/02/26 07:25:03 Serving request: /
2024/02/26 07:25:13 Serving request: /
2024/02/26 07:25:23 Serving request: /
What above info tell us?
- Server Listening on Port 8080: The first log entry stating "Server listening on port 8080" confirms that your application started successfully and is ready to accept HTTP requests on port 8080, which is the port targeted by the liveness probe as per your configuration.
- Serving Request Logs: The repeated log entries with "Serving request: /" show that the application is receiving and responding to HTTP GET requests at the root path.
These logs confirm that the liveness probe is working as expected by periodically checking the health of your application via HTTP requests. Each "Serving request: /" log entry corresponds to a liveness probe check, and the fact that these requests are being logged as served suggests that the application is responding correctly to the probe's checks, indicating a healthy state.
#Troubleshooting Liveness Probes
#Common Issues with Liveness Probes
- Startup Delays: Application takes longer to start up than the kubelet expects, causing the probe to fail.
- Frequent Health Checks: Probe checks the health of the application too frequently, leading to unnecessary restarts.
#How to Troubleshoot and Resolve These Issues
- Adjust Probe Parameters: Increase the initial delay for the probe to give the application more time to start up. Decrease the frequency of the health checks to prevent unnecessary restarts.
- Goal: Ensure the liveness probe accurately reflects the health status of your application running in the container. This helps Kubernetes restart unhealthy containers and ensure applications self-heal and continue to serve requests.
#Conclusion
Throughout this article, we have demonstrated the use of liveness probes and how they serve as the guardians of application health within containers. These probes ensure that applications remain responsive and operational. However, while Kubernetes is a powerful and feature-rich platform, setting it up and maintaining it can present challenges. This is where a product like Qovery comes into play. Qovery simplifies the Kubernetes experience, making the installation and maintenance processes more accessible to developers. By abstracting the complexities of Kubernetes, Qovery enables developers to focus on what they do best, building applications, not managing infrastructure. With Qovery, the power of Kubernetes is made easy, allowing developers to harness its full potential without getting bogged down by its complexities. Get started for free today!
Your Favorite DevOps Automation Platform
Qovery is a DevOps Automation Platform Helping 200+ Organizations To Ship Faster and Eliminate DevOps Hiring Needs
Try it out now!

Your Favorite DevOps Automation Platform
Qovery is a DevOps Automation Platform Helping 200+ Organizations To Ship Faster and Eliminate DevOps Hiring Needs
Try it out now!


